Project2
前言
本次是CS184的第二个project,主要内容是贝塞尔曲线和曲面,样条和曲面细分。包含了CS184 Spring2019课程第八节和第九节。Section1 是关于贝塞尔曲线和曲面的,Section2 是关于三角形mesh的曲面细分。涉及实现贝塞尔曲面的de Casteljau’s 算法。曲面细分需要用到一种图形学相关数据结构,主要是halfedge mesh这种数据结构。参考这篇文章
本次所有需要需改的代码均在student_code.cpp这个文件里。
Section I: Bezier Curves and Surfaces
Part 1: Bezier curves with 1D de Casteljau subdivision
题目介绍
第一部分关于1D de Casteljau算法的实现,这个算法是比较常见的找到贝塞尔曲面上一点的方法。
需要修改 BezierCurve::evaluateStep 这个函数,BezierCurve 这个类有一个控制点的vector ,提前会把控制点加载进来。
实现原理
这个算法的原理参见下图,比方说一开始四个控制点(我称为一阶控制点),每两个点进行一次插值(获取一个二阶点),一轮插值之后。变为三个控制点,于是再次对这三个二阶进行两两插值,重复这个过程,直到最后一个点。
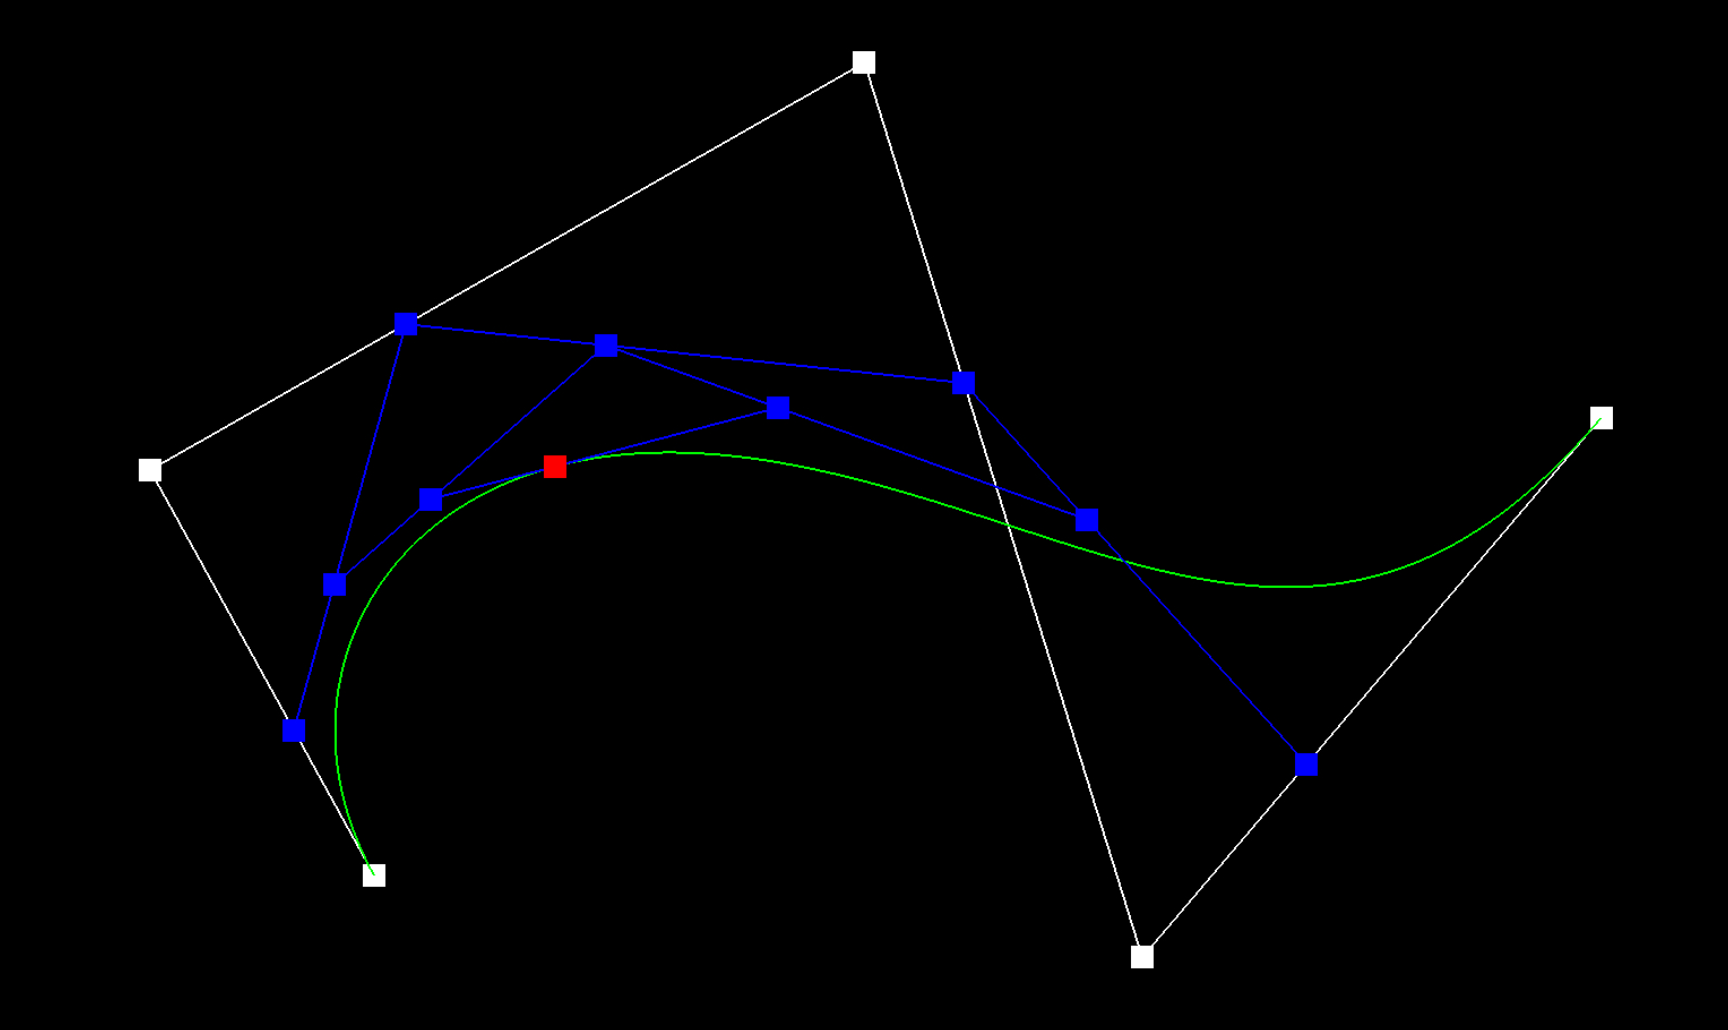
BezierCurve 类有下面两个vector,evaluatedLevels[0] 就是初始的四个控制点(一阶控制点),evaluatedLevels[1]就是二阶控制点,依次类推。
    std::vector<Vector2D> controlPoints; // The original control points of the Bezier curve

    std::vector< std::vector<Vector2D> > evaluatedLevels; // Levels of points evaluated through de Casteljau
这个还蛮简单的,实现代码如下。
void BezierCurve::evaluateStep()
{
// TODO Part 1.
// Perform one step of the Bezier curve's evaluation at t using de Casteljau's algorithm for subdivision.
// Store all of the intermediate control points into the 2D vector evaluatedLevels.
int maxLevel = numControlPoints;
int currentLevel = evaluatedLevels.size();
if(currentLevel == maxLevel)
return;
else
{
std::vector<Vector2D> currentLevelPoints = evaluatedLevels[evaluatedLevels.size()-1];
int nextLevelSize = currentLevelPoints.size() - 1;
std::vector<Vector2D> newLevelPoints(nextLevelSize);
for(int i = 0; i < nextLevelSize; i++)
{
newLevelPoints[i] = currentLevelPoints[i] * (1 - t) + currentLevelPoints[i + 1] * t;
}
evaluatedLevels.push_back(newLevelPoints);
}
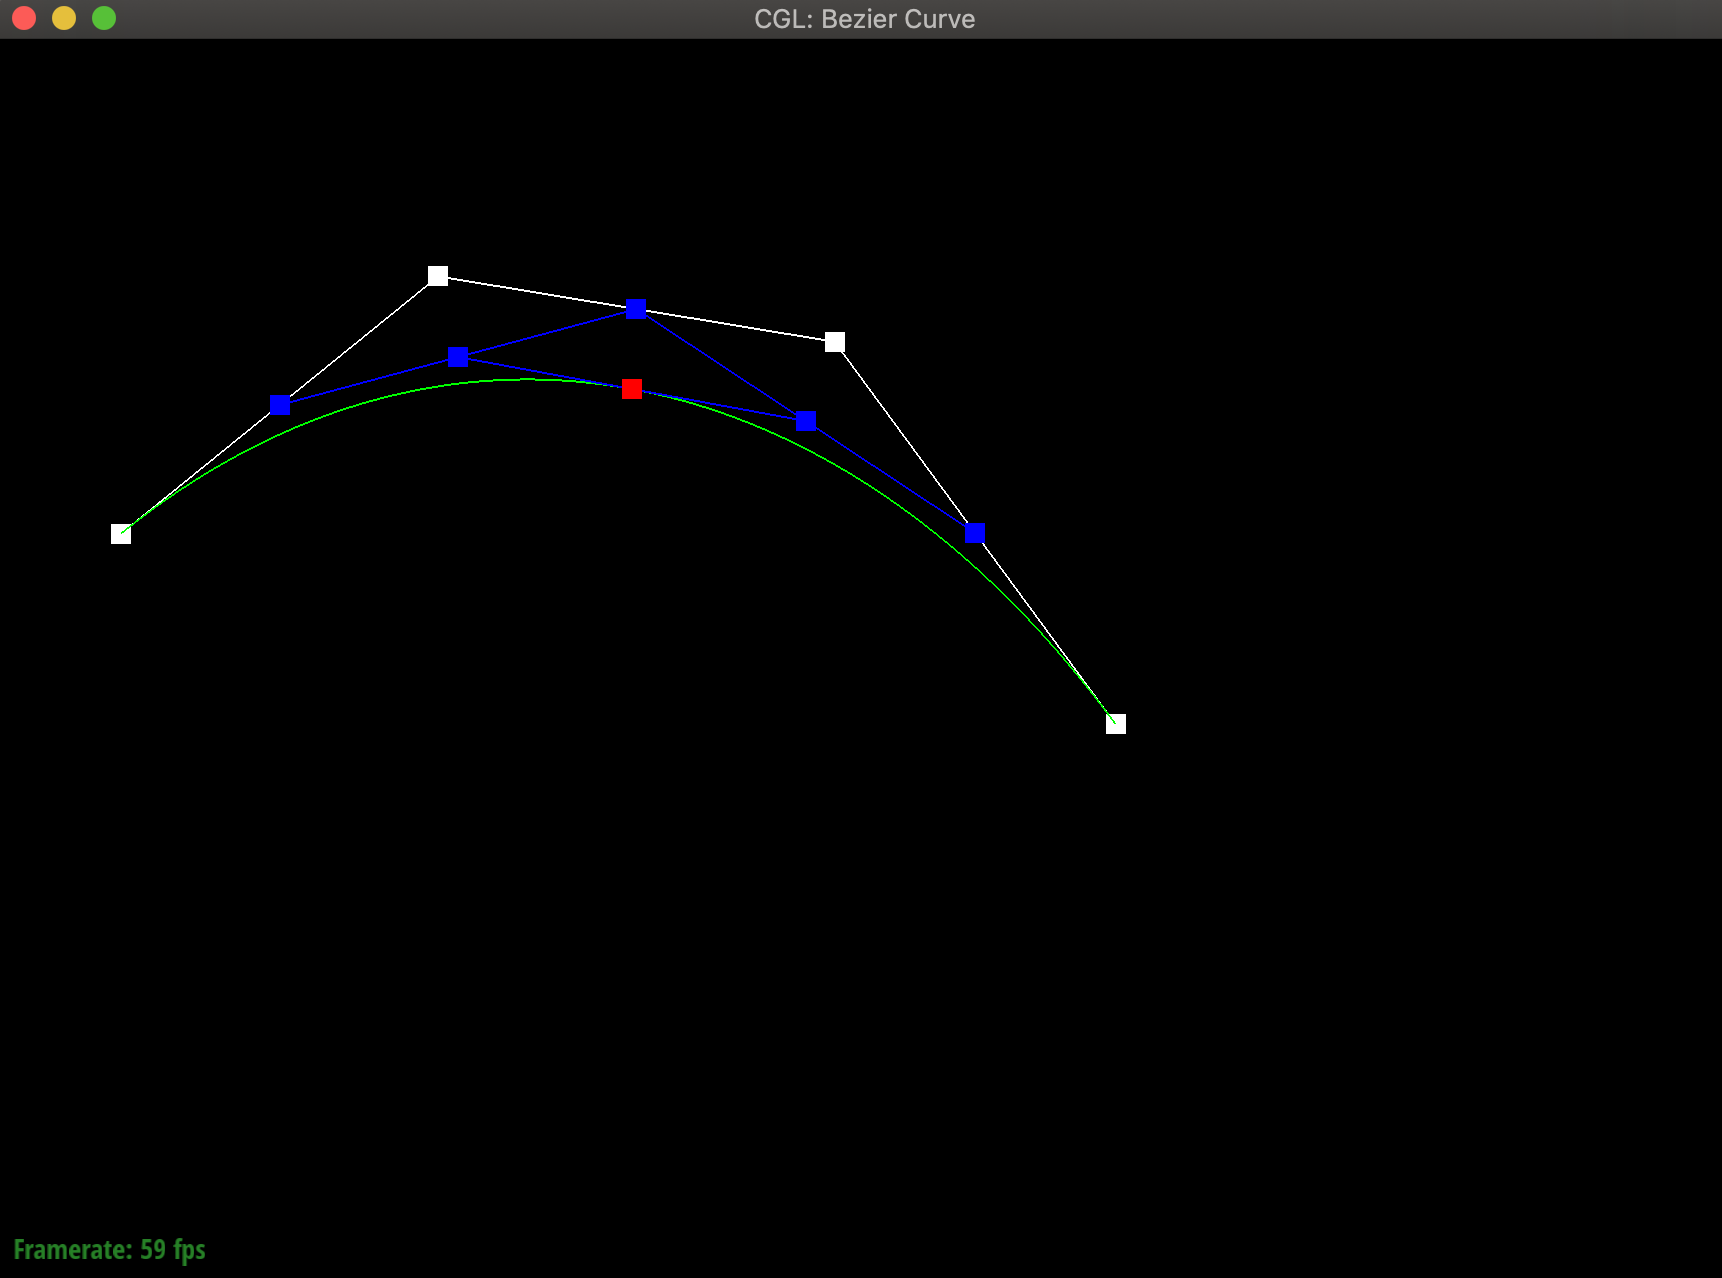
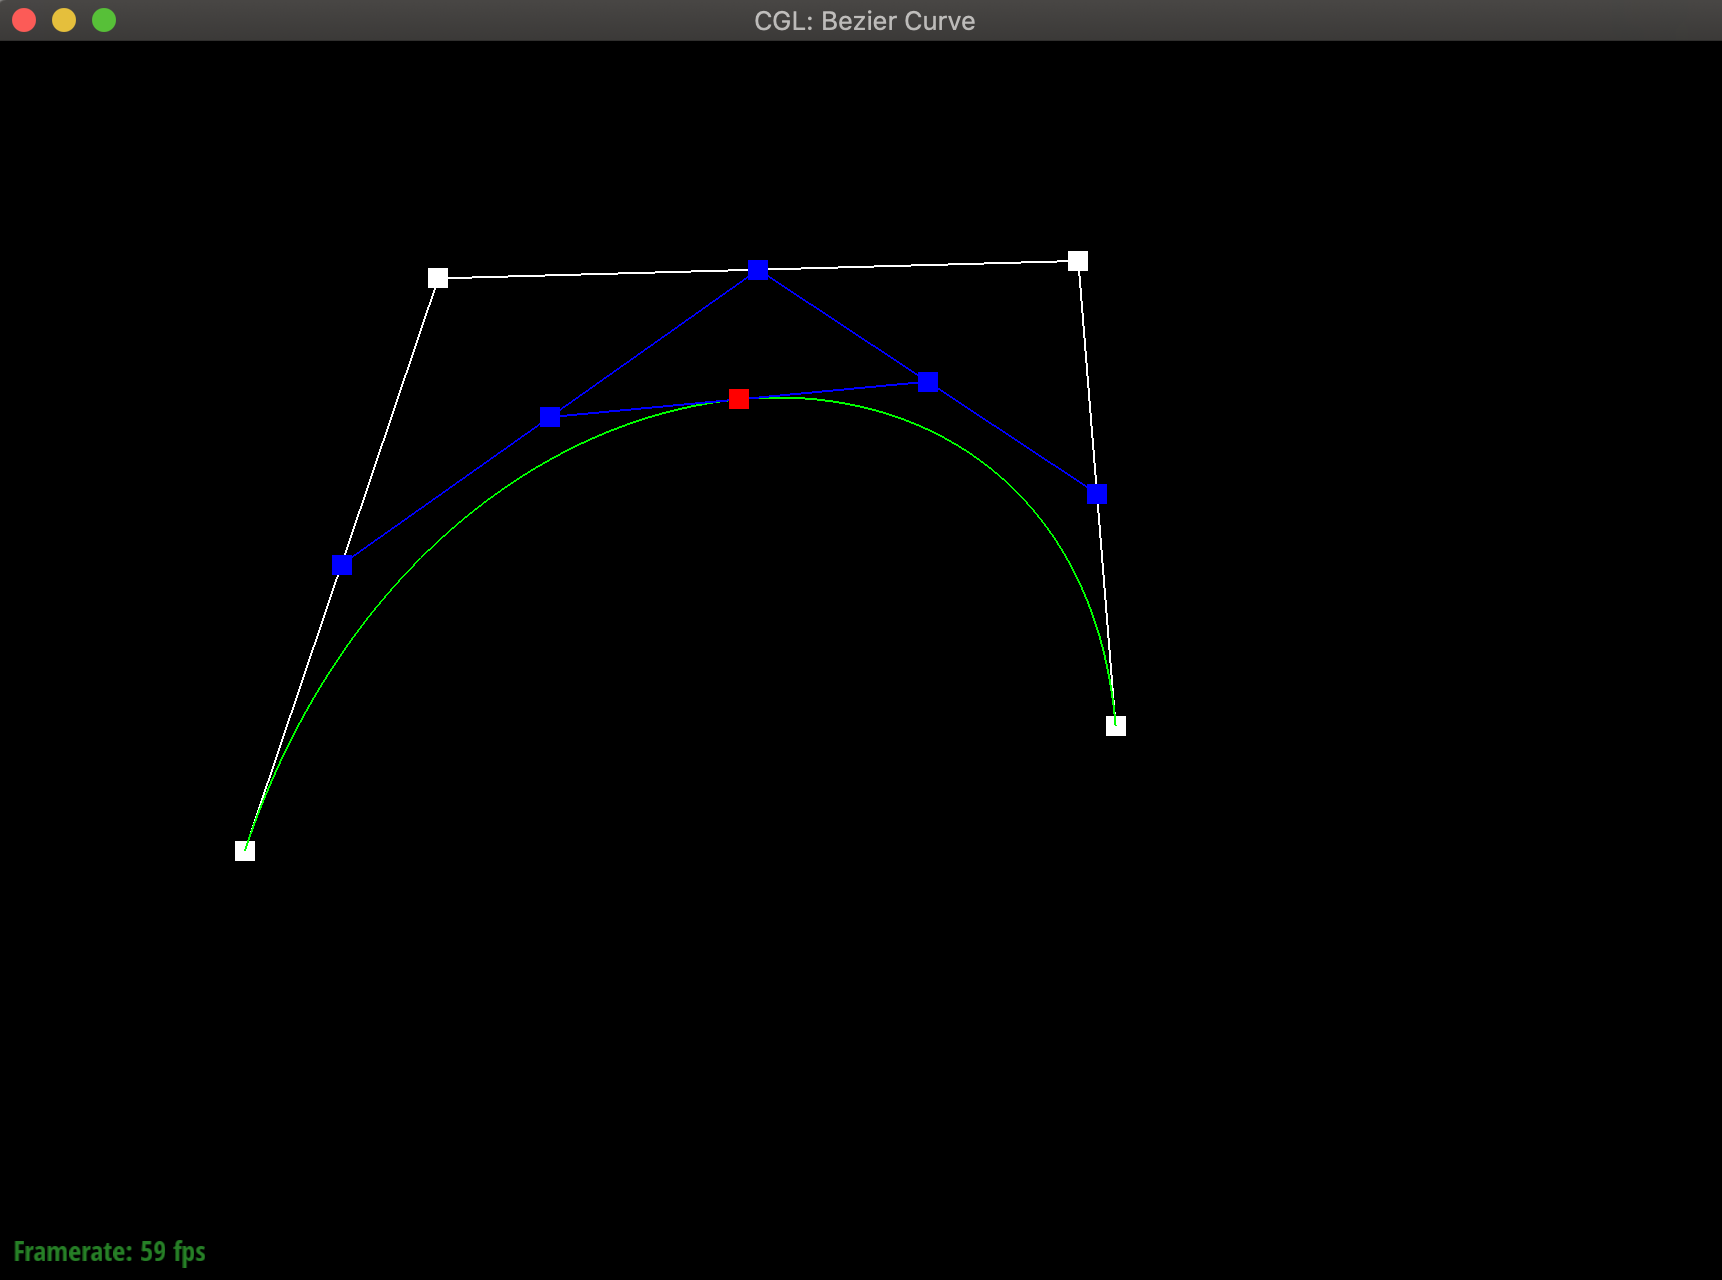
}运行结果
结果如下
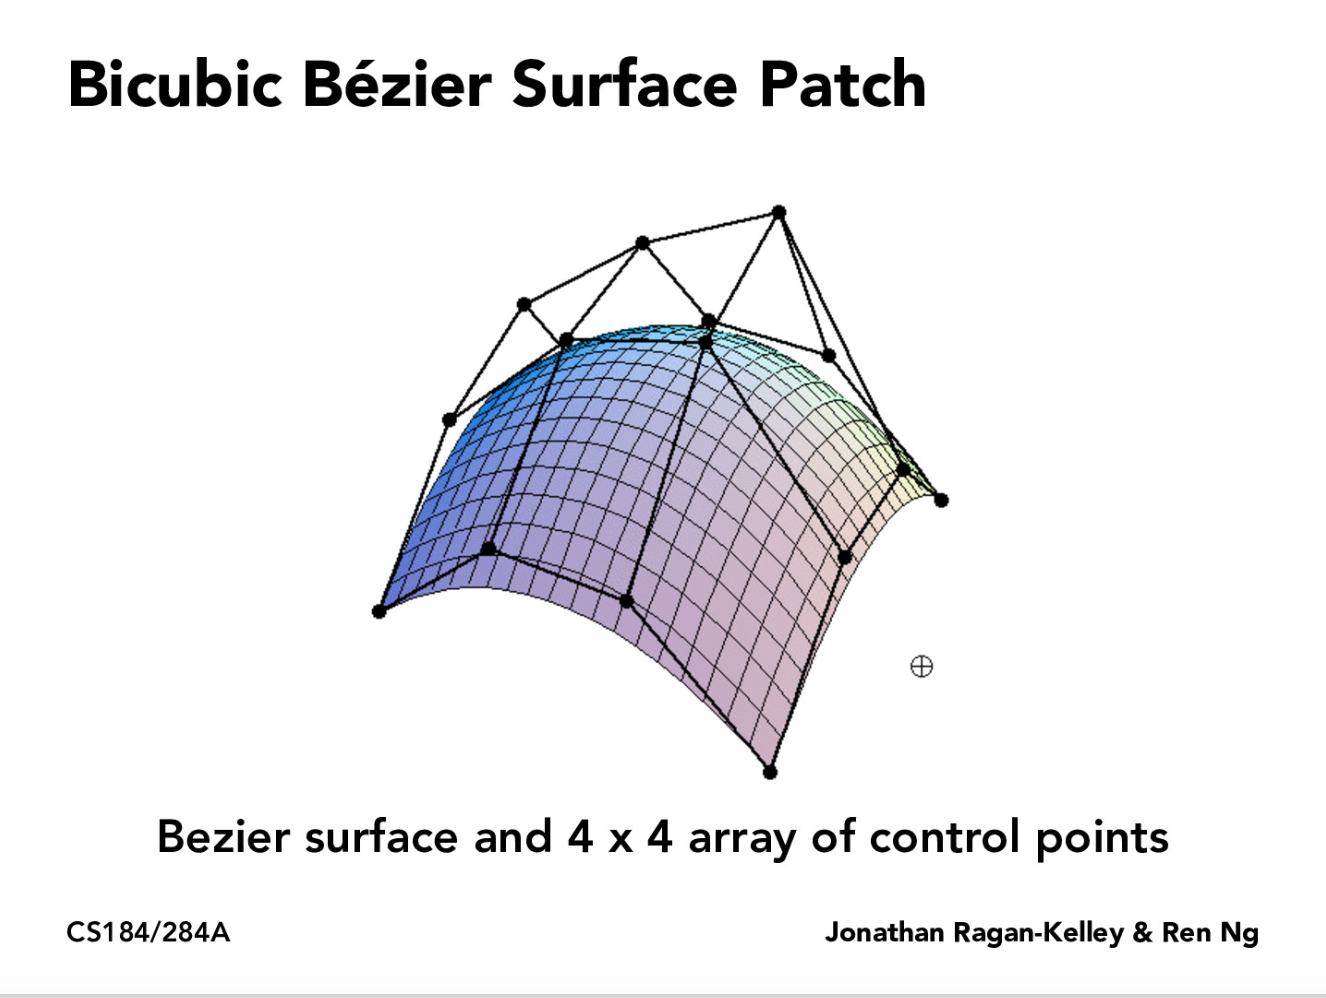
Part 2: Bezier surfaces with separable 1D de Casteljau subdivision
题目介绍
上一题是贝塞尔曲线,这一题则是贝塞尔曲面,其实道理是一样的,只不过现在我们找到多条贝塞尔曲线,
之后加入第三个维度,再次运用de Casteljau算法形成曲面。如下所示
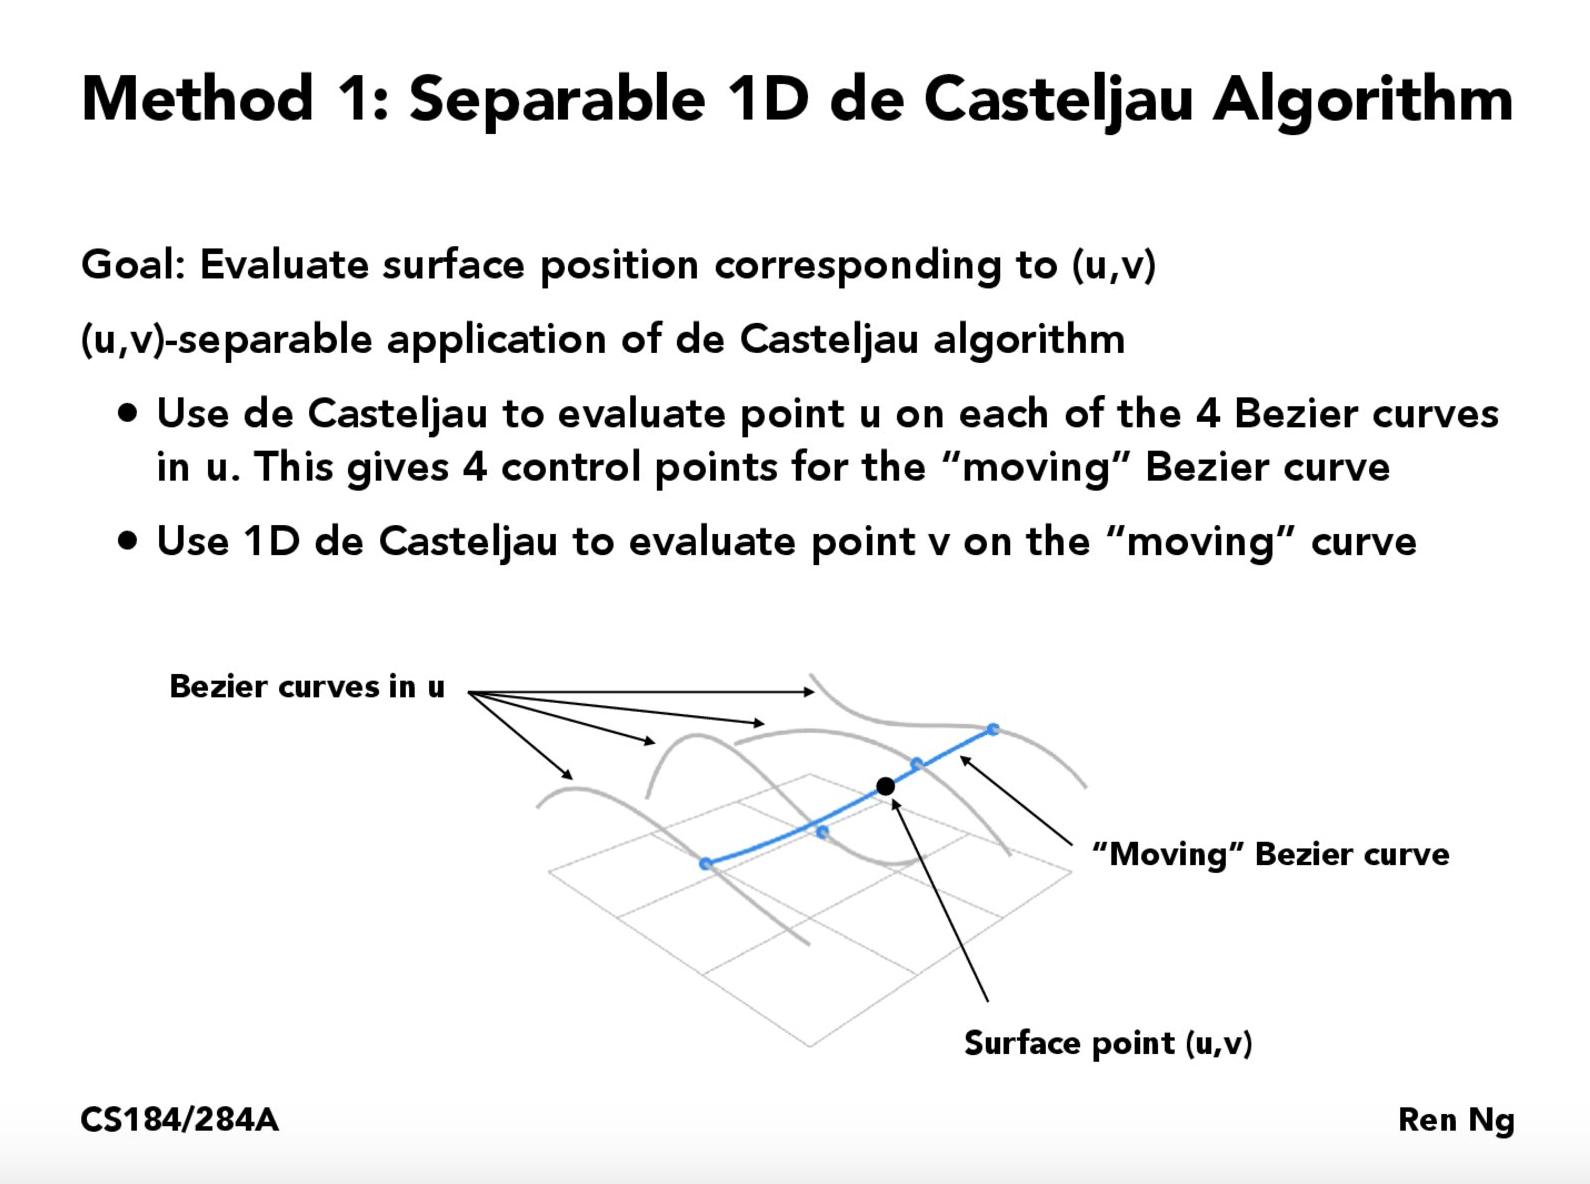
实现原理
本题相关的类是BezierPatch,该类和第一题中的BezierCurve类似,这是关于曲面。
实现两个函数,BezierPatch::evaluate和BezierPatch::evaluate1D。首先和第一题一样controlPoints这个二维数组(假设是4*4),对每四个control point做一次1D de Casteljau,形成四个点,最后对这个四个点再做一次,得到曲面上的一点。
算法流程如下图。
Vector3D BezierPatch::evaluate(double u, double v) const
    {
        // TODO Part 2.
        // Evaluate the Bezier surface at parameters (u, v) through 2D de Casteljau subdivision.
        // (i.e. Unlike Part 1 where we performed one subdivision level per call to evaluateStep, this function
        // should apply de Casteljau's algorithm until it computes the final, evaluated point on the surface)
        // 现在第一次形成四条曲线用的参数u,第二次形成曲面用的参数v
        std::vector<Vector3D> p;
        for(int i = 0; i < controlPoints.size(); ++i){
            p.push_back(evaluate1D(controlPoints[i], u));
        }
        return evaluate1D(p,v);
    }

    //返回1D贝塞尔曲线上的一个点
    Vector3D BezierPatch::evaluate1D(std::vector<Vector3D> points, double t) const
    {
        // TODO Part 2.
        // Optional helper function that you might find useful to implement as an abstraction when implementing BezierPatch::evaluate.
        // Given an array of 4 points that lie on a single curve, evaluates the Bezier curve at parameter t using 1D de Casteljau subdivision.
        //我的解决方案
        std::vector<Vector3D> tmpControlPoints(points);
        std::vector<Vector3D> finalControlPoints;

        while (tmpControlPoints.size() >= 2)
        {
            finalControlPoints.clear();
            for (int j = 1; j < tmpControlPoints.size(); j++) {
                Vector3D tmp(tmpControlPoints[j - 1] * (1 - t) + tmpControlPoints[j] * t);
                finalControlPoints.push_back(tmp);
            }
            tmpControlPoints.clear();
            tmpControlPoints.assign(finalControlPoints.begin(), finalControlPoints.end());
        }
        Vector3D result;
        if (!finalControlPoints.empty())
        {
            result = finalControlPoints[0];
        }
        return result;
    }
运行结果
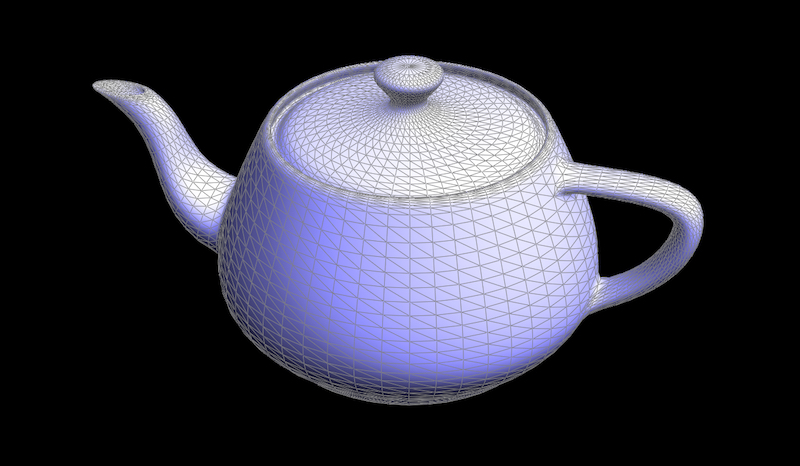
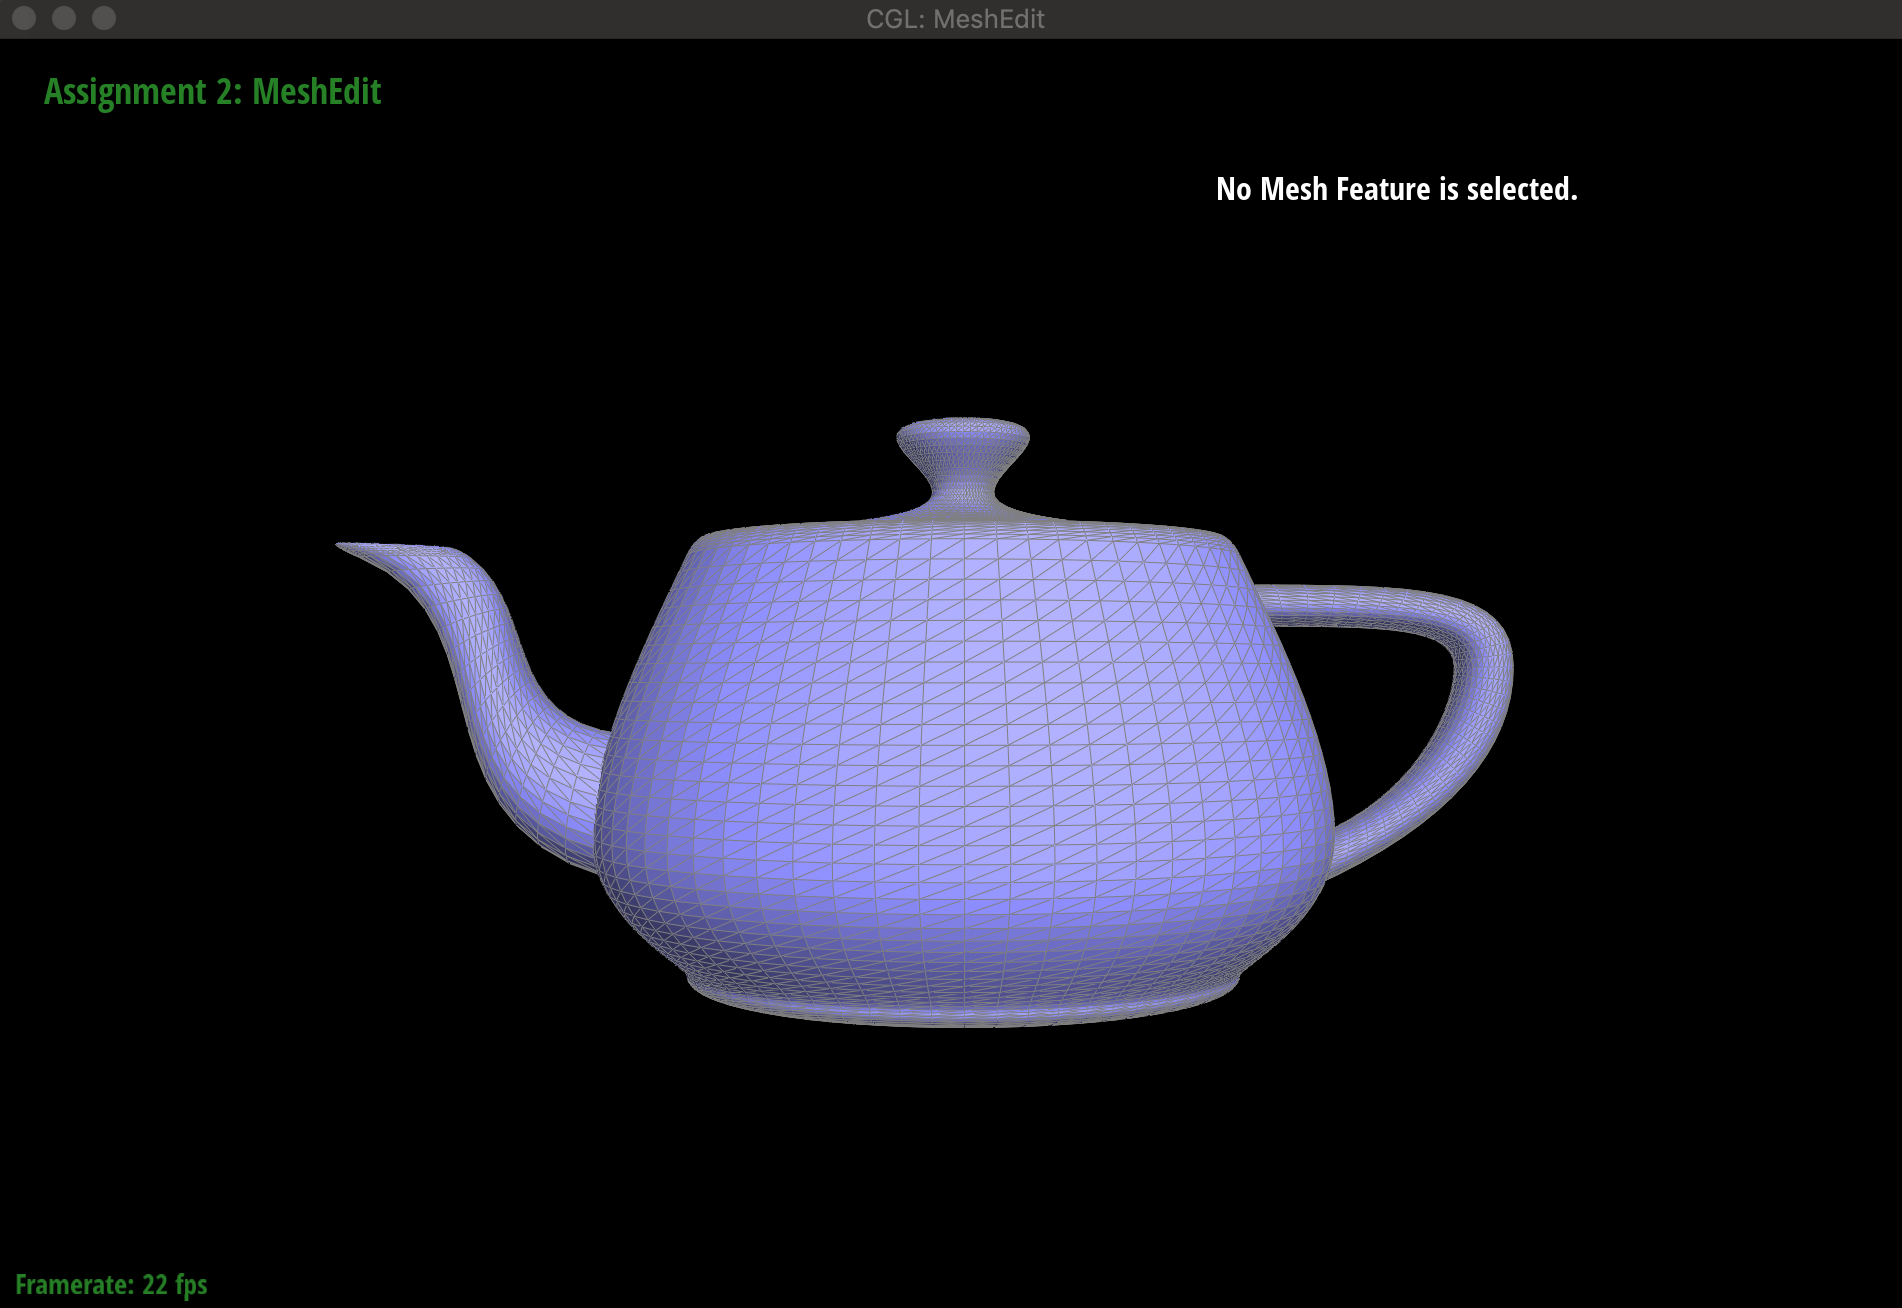
在工作目录下运行命令
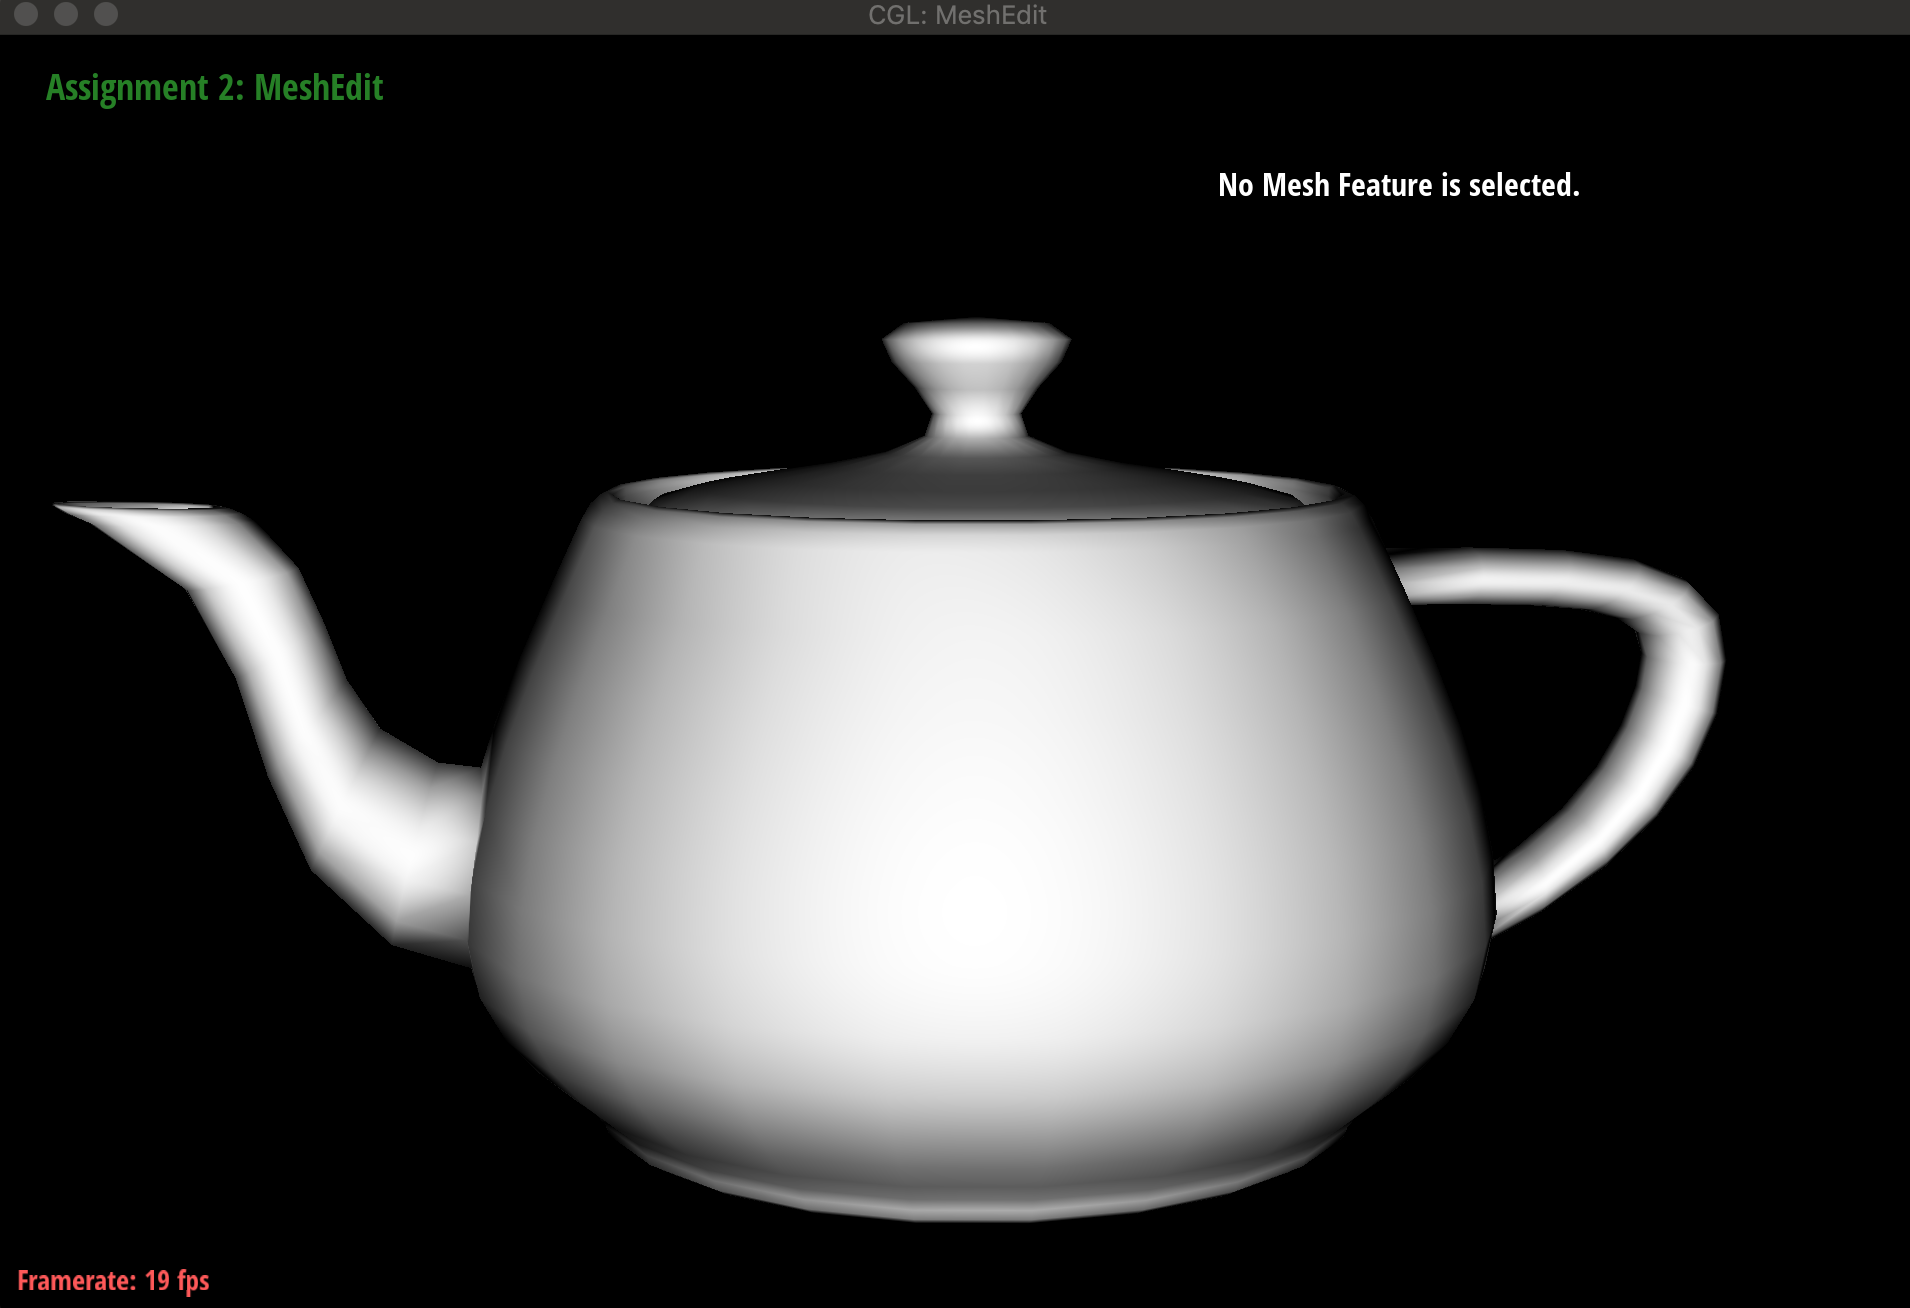
../meshedit /bez/teapot.bez得到一个经典的犹他茶壶。
Section II: Loop Subdivision of General Triangle Meshes
第二个section是关于曲面细分,主要涉及halfedgemesh这个数据结构,很有意思的一个数据结构,参考这篇文章
Part 3: Average normals for half-edge meshes
题目介绍
本题求一个顶点处平均权重的normal,每个顶点有一个normal,但是顶点处的normal不像平面那么直观,一个平面的normal垂直于这个平面上所有的向量,这很明显。但是对于一个vertex的normal,我们是通过将这个顶点周围的所有相邻的平面的normal加权求和。
这么做的好处有什么呢,就是可以使得最终显示在屏幕上的图形更加的平滑。参见运行结果。
原因是计算光照的时候我们要用normal的信息,在本题之前是直接使用每个三角mesh的normal(也就是垂直于该平面的normal),然后采用一个光照模型比如phong shading。不使用vertex normal,直接用每个三角面的normal算光照的话单个三角面内的像素计算出来的颜色都一样
但是使用了vertex normal,比方说用phong shading,就是对三角面的三个顶点分别计算,这样三角形内的每个像素再根据这三个顶点做差值,所以显示出来的图像就是平滑的而不是一个个三角面。
总结一下就是根据三个顶点的颜色插值得到平滑图形,而计算三个顶点光照和颜色需要normal。
原理介绍
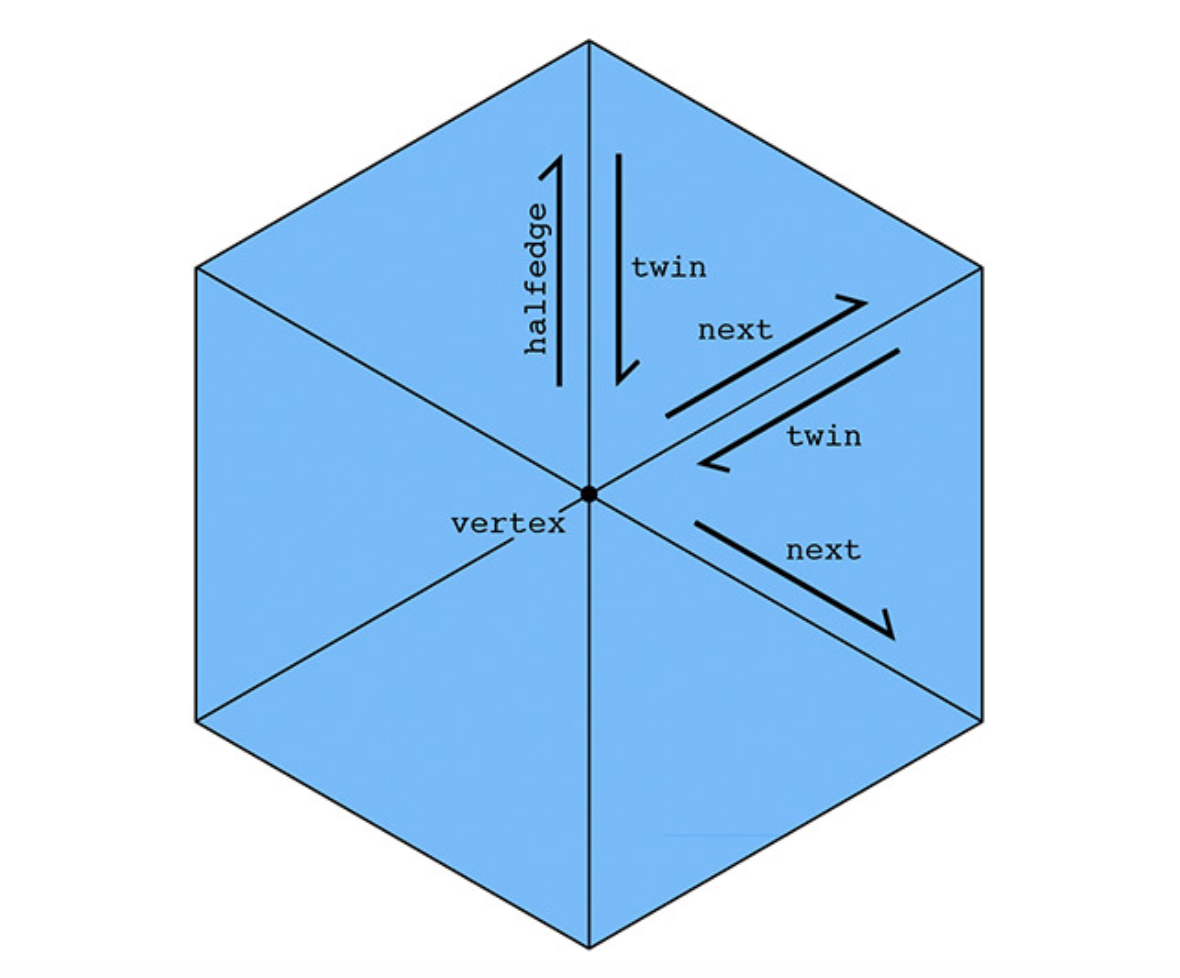
只需要完成Vertex::normal这个函数,我们对于该顶点相邻的所有平面(三角形)normal加权求和,权重就是三角形的面积,也就是面积越大权重越大。那么怎么遍历所有的face呢?就是采用halfedgemesh这个数据结构,该数据结构是一整个mesh(有可能整个模型就这一个mesh),这个mesh包含了edge,face,vertex,halfedge的链表。其的核心就是halfedge类,halfedge就是一个有向向量,每个halfedge都关联五个其他基本的几何单位,halfedge有指向起点vertex的iterator(c++中类似指针的一个概念),指向edge,face,下一个halfedge和twin halfedge(同一条edge上反方向的一个halfedge)的iterator,这样halfedge就像一个中枢站一样。如上图所示,每个vertex都有关联的一个halfedge,这个halfedge是任意一个以该vertex为起点的halfedge。
         HalfedgeIter _twin; ///< halfedge on the "other side" of the edge
         HalfedgeIter _next; ///< next halfedge around the current face
         VertexIter _vertex; ///< vertex at the "base" or "root" of this halfedge
         EdgeIter _edge; ///< associated edge
         FaceIter _face; ///< face containing this halfedge
代码如下
Vector3D Vertex::normal(void) const
{
// TODO Part 3.
// TODO Returns an approximate unit normal at this vertex, computed by
// TODO taking the area-weighted average of the normals of neighboring
// TODO triangles, then normalizing.
Vector3D normal(0,0,0); // initialize a vector to store your normal sum
HalfedgeCIter h = halfedge(); // Since we're in a Vertex, this returns a halfedge
HalfedgeCIter hConst = h;
double sum = 0.;
do
{
//要取得是平面的normal,而不是点的normal
Vector3D nighborNormal(h->face()->normal());
//下面是两个向量,然后做叉乘
Vector3D v1(h->vertex()->position - (h->twin()->vertex())->position);
Vector3D v2(h->vertex()->position - (h->twin()->next()->twin()->vertex()->position));
double tmpWeight = cross(v1, v2).norm();
sum += tmpWeight;
//三角形面积的两倍(平行四边形的面积)乘上normal累加上去
normal += nighborNormal * tmpWeight;
//std::cout<< "暂时输出normal为" << normal<<std::endl;
h = h->twin()->next();
}while(h != hConst);
//最后归一化
normal /= sum;
return normal;
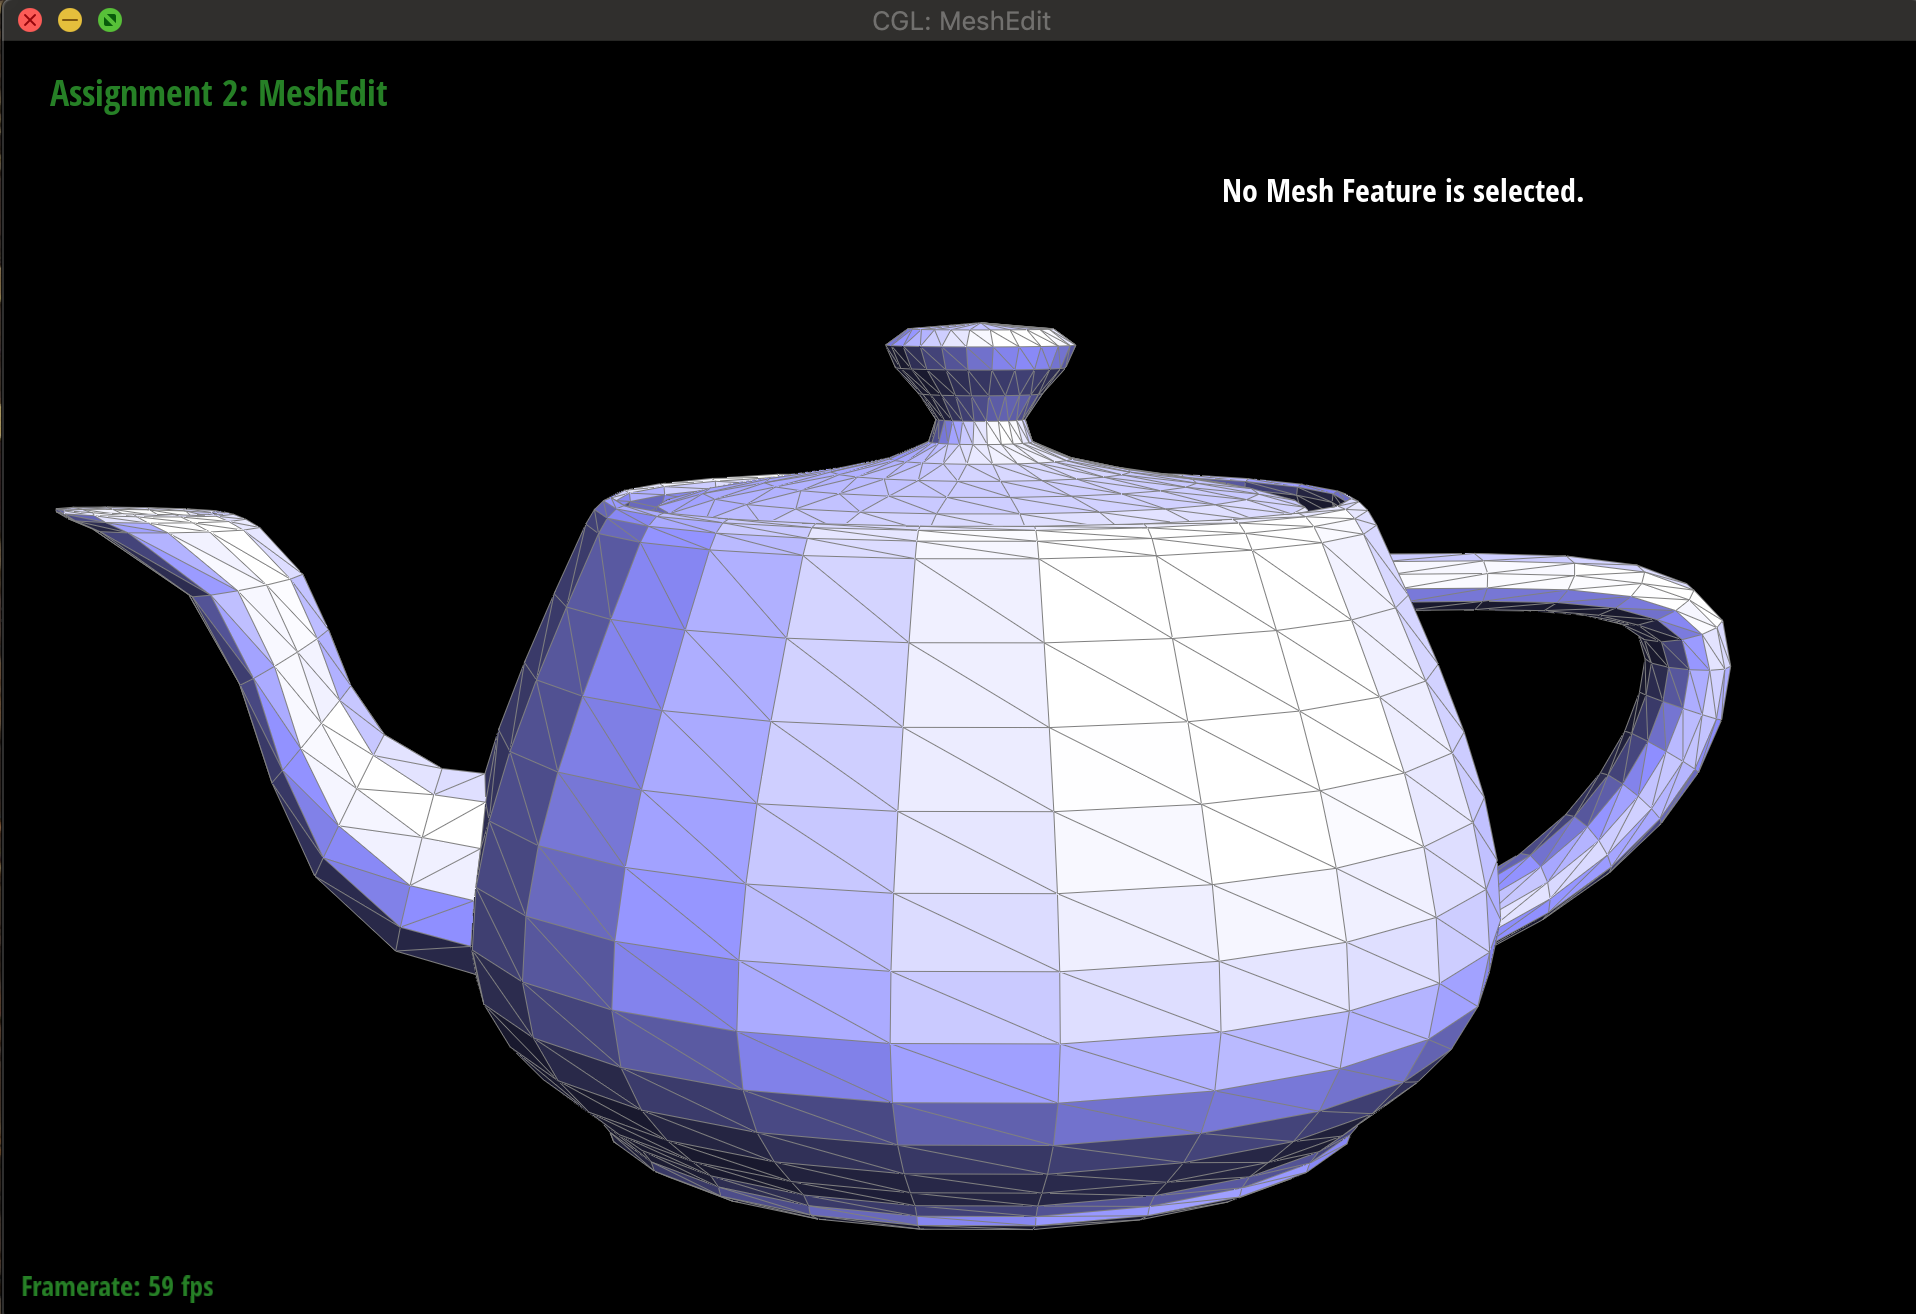
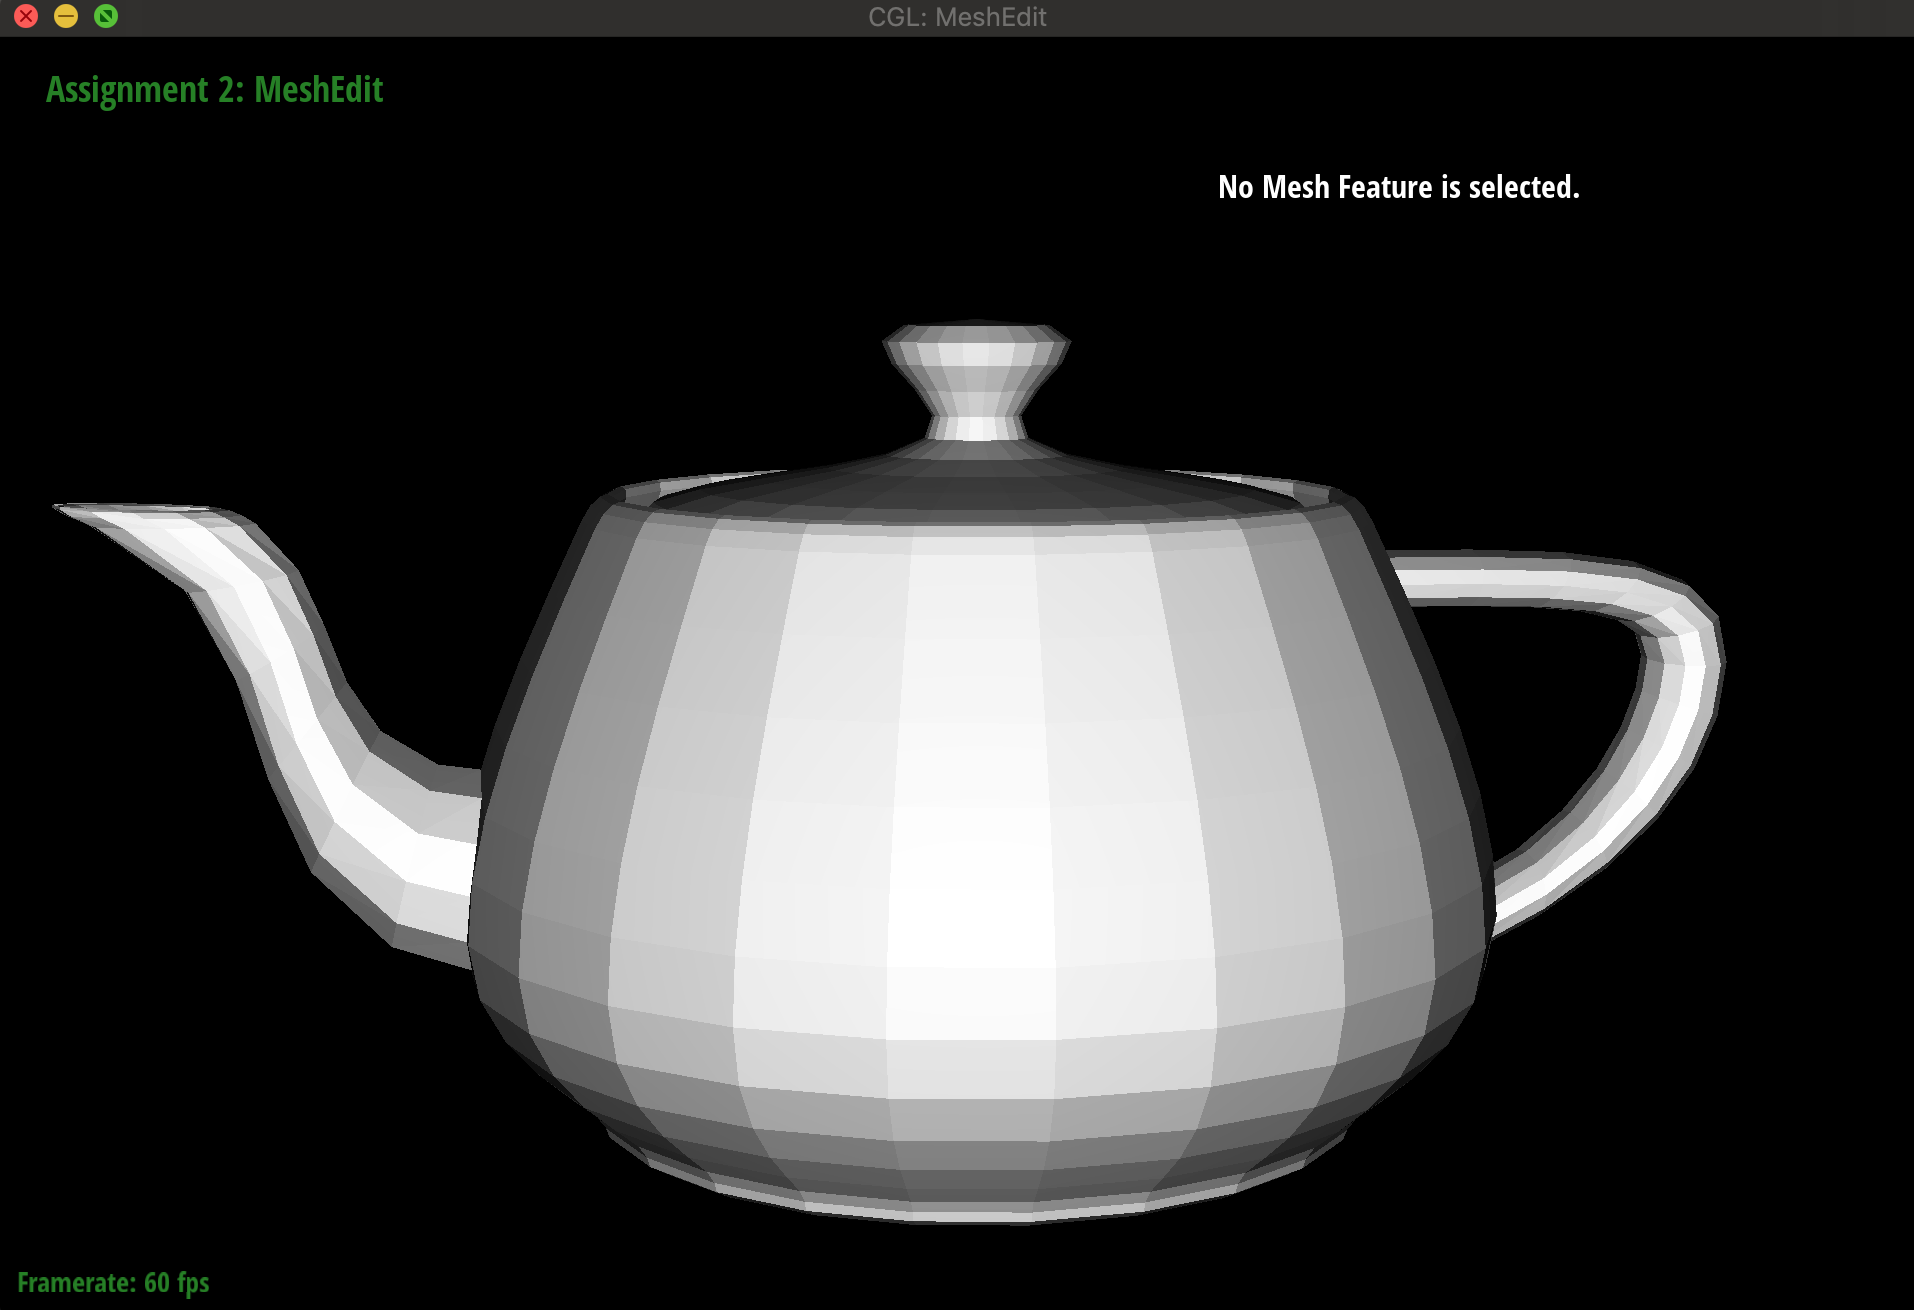
}运行结果
同样运行以下命令
../meshedit /dae/teapot.dae然后我们按下Q键,就会显示重新计算normal之后的模型,可以看到光滑了很多。 按下w键是切换到GLSL shader。

Part 4: Half-edge flip
题目介绍
本题是flip翻转half-edge,将边的连接变换。
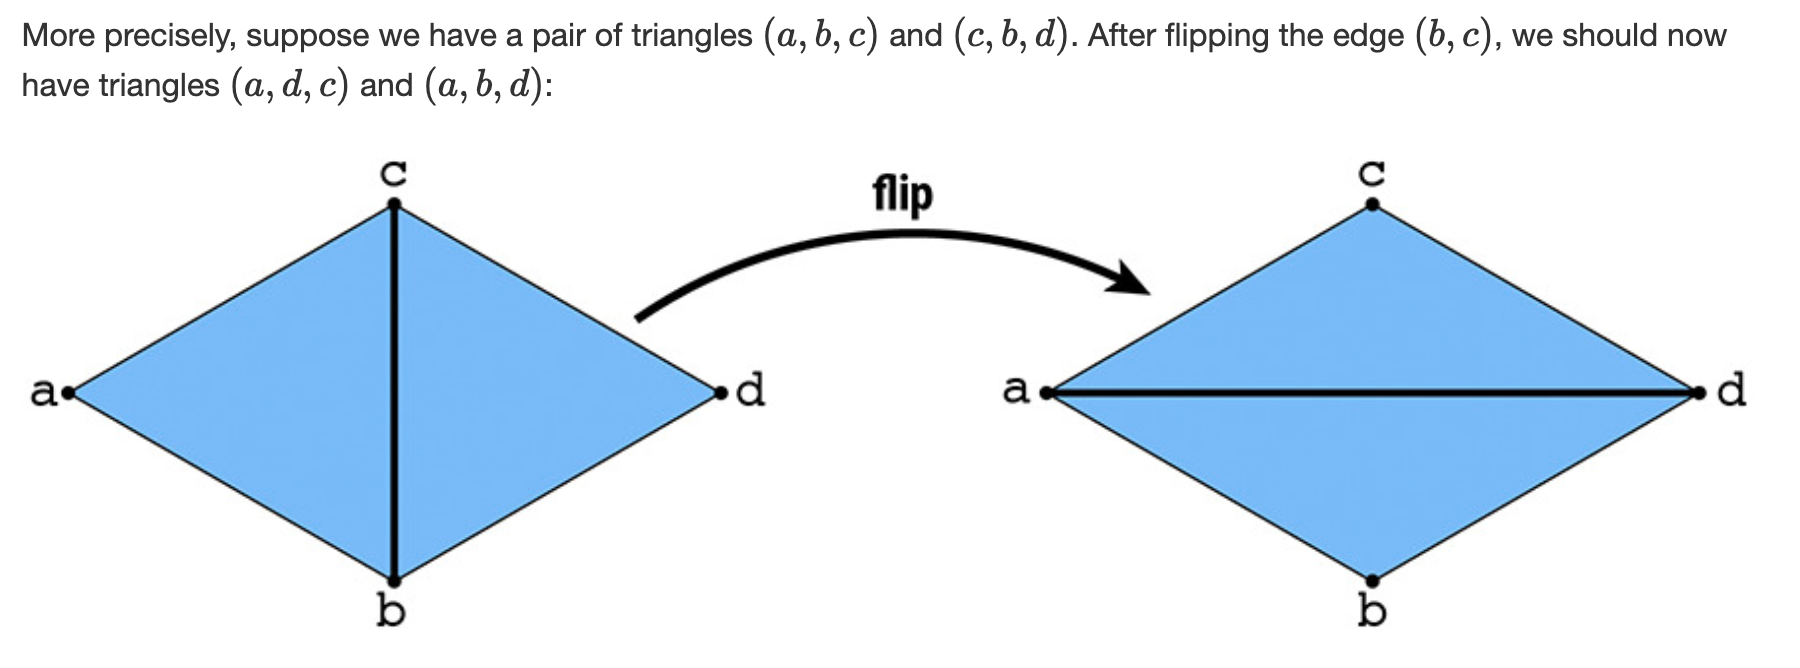
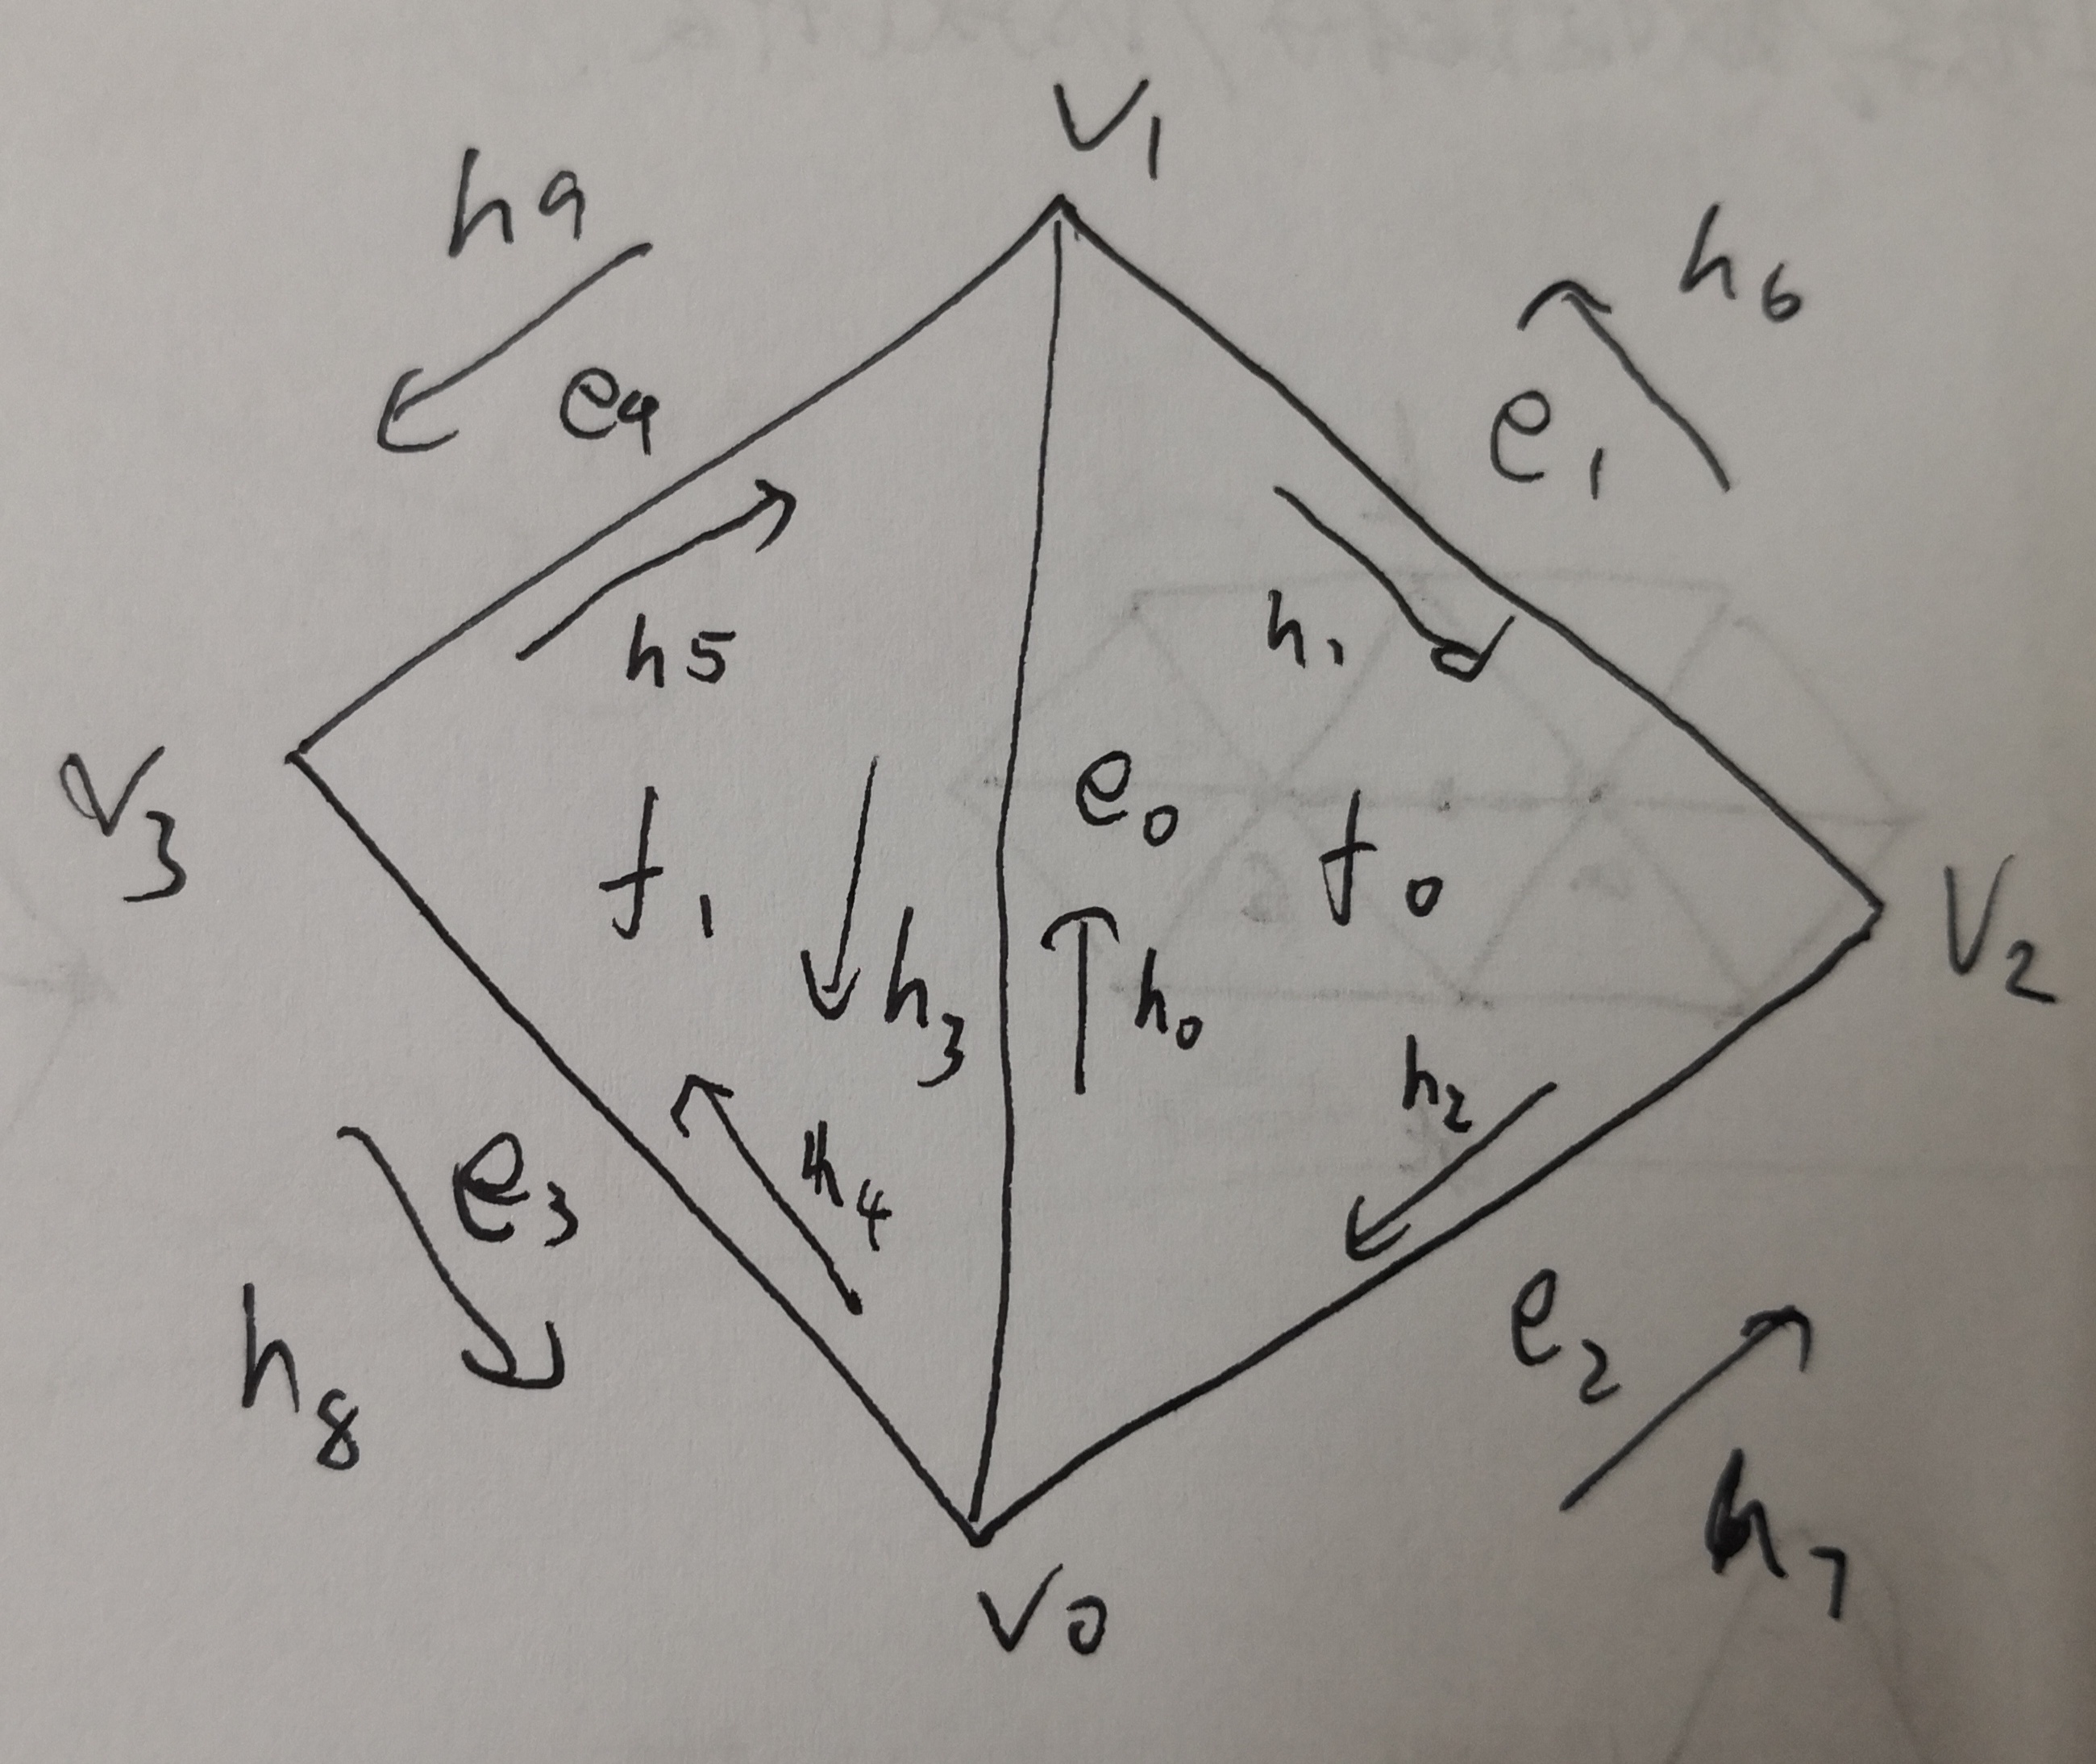
#### 实现原理 这道题只要遵循[这篇guide](http://15462.courses.cs.cmu.edu/fall2015content/misc/HalfedgeEdgeOpImplementationGuide.pdf)就不会有什么问题了,就是一些繁琐的操作。但是思路很好,先把图画出来,原先有哪些edge,vertex,halfedge,face,然后在画出flip之后的图,看看这四种基本几何单位又有哪些。然后修改各个类的iterator指向就完事儿了。我的实现和guide中的图一致。
代码如下
EdgeIter HalfedgeMesh::flipEdge(EdgeIter e0)
{
// TODO Part 4.
// TODO This method should flip the given edge and return an iterator to the flipped edge.
// 首先获取所有的可能改变的元素
FaceIter f0 = e0->halfedge()->face();
FaceIter f1 = e0->halfedge()->twin()->face();
if(f0->isBoundary() || f1->isBoundary())
{
return e0;
}
HalfedgeIter h0 = e0->halfedge();
HalfedgeIter h1 = h0->next();
HalfedgeIter h2 = h1->next();
HalfedgeIter h3 = h0->twin();
HalfedgeIter h4 = h3->next();
HalfedgeIter h5 = h4->next();
HalfedgeIter h6 = h1->twin();
HalfedgeIter h7 = h2->twin();
HalfedgeIter h8 = h4->twin();
HalfedgeIter h9 = h5->twin();
VertexIter v0 = h0->vertex();
VertexIter v1 = h3->vertex();
VertexIter v2 = h6->vertex();
VertexIter v3 = h8->vertex();
EdgeIter e1 = h1->edge();
EdgeIter e2 = h2->edge();
EdgeIter e3 = h4->edge();
EdgeIter e4 = h5->edge();
//接着重新分配
//想了一下,分配顺序应该没有关系
h0->next() = h1;
h0->twin() = h3;
h0->face() = f0;
h0->vertex() = v3;
h0->edge() = e0;
h1->next() = h2;
h1->twin() = h7;
h1->face() = f0;
h1->vertex() = v2;
h1->edge() = e2;
h2->next() = h0;
h2->twin() = h8;
h2->face() = f0;
h2->vertex() = v0;
h2->edge() = e3;
h3->next() = h4;
h3->twin() = h0;
h3->face() = f1;
h3->vertex() = v2;
h3->edge() = e0;
h4->next() = h5;
h4->twin() = h9;
h4->face() = f1;
h4->vertex() = v3;
h4->edge() = e4;
h5->next() = h3;
h5->twin() = h6;
h5->face() = f1;
h5->vertex() = v1;
h5->edge() = e1;
h6->next() = h6->next();
h6->twin() = h5;
h6->face() = h6->face();
h6->vertex() = v2;
h6->edge() = e1;
h7->next() = h7->next();
h7->twin() = h1;
h7->face() = h7->face();
h7->vertex() = v0;
h7->edge() = e2;
h8->next() = h8->next();
h8->twin() = h2;
h8->face() = h8->face();
h8->vertex() = v3;
h8->edge() = e3;
h9->next() = h9->next();
h9->twin() = h4;
h9->face() = h9->face();
h9->vertex() = v1;
h9->edge() = e4;
v0->halfedge() = h2;
v1->halfedge() = h5;
v2->halfedge() = h3;
v3->halfedge() = h0;
e0->halfedge() = h0;
e1->halfedge() = h5;
e2->halfedge() = h1;
e3->halfedge() = h2;
e4->halfedge() = h4;
f0->halfedge() = h0;
f1->halfedge() = h3;
return e0;
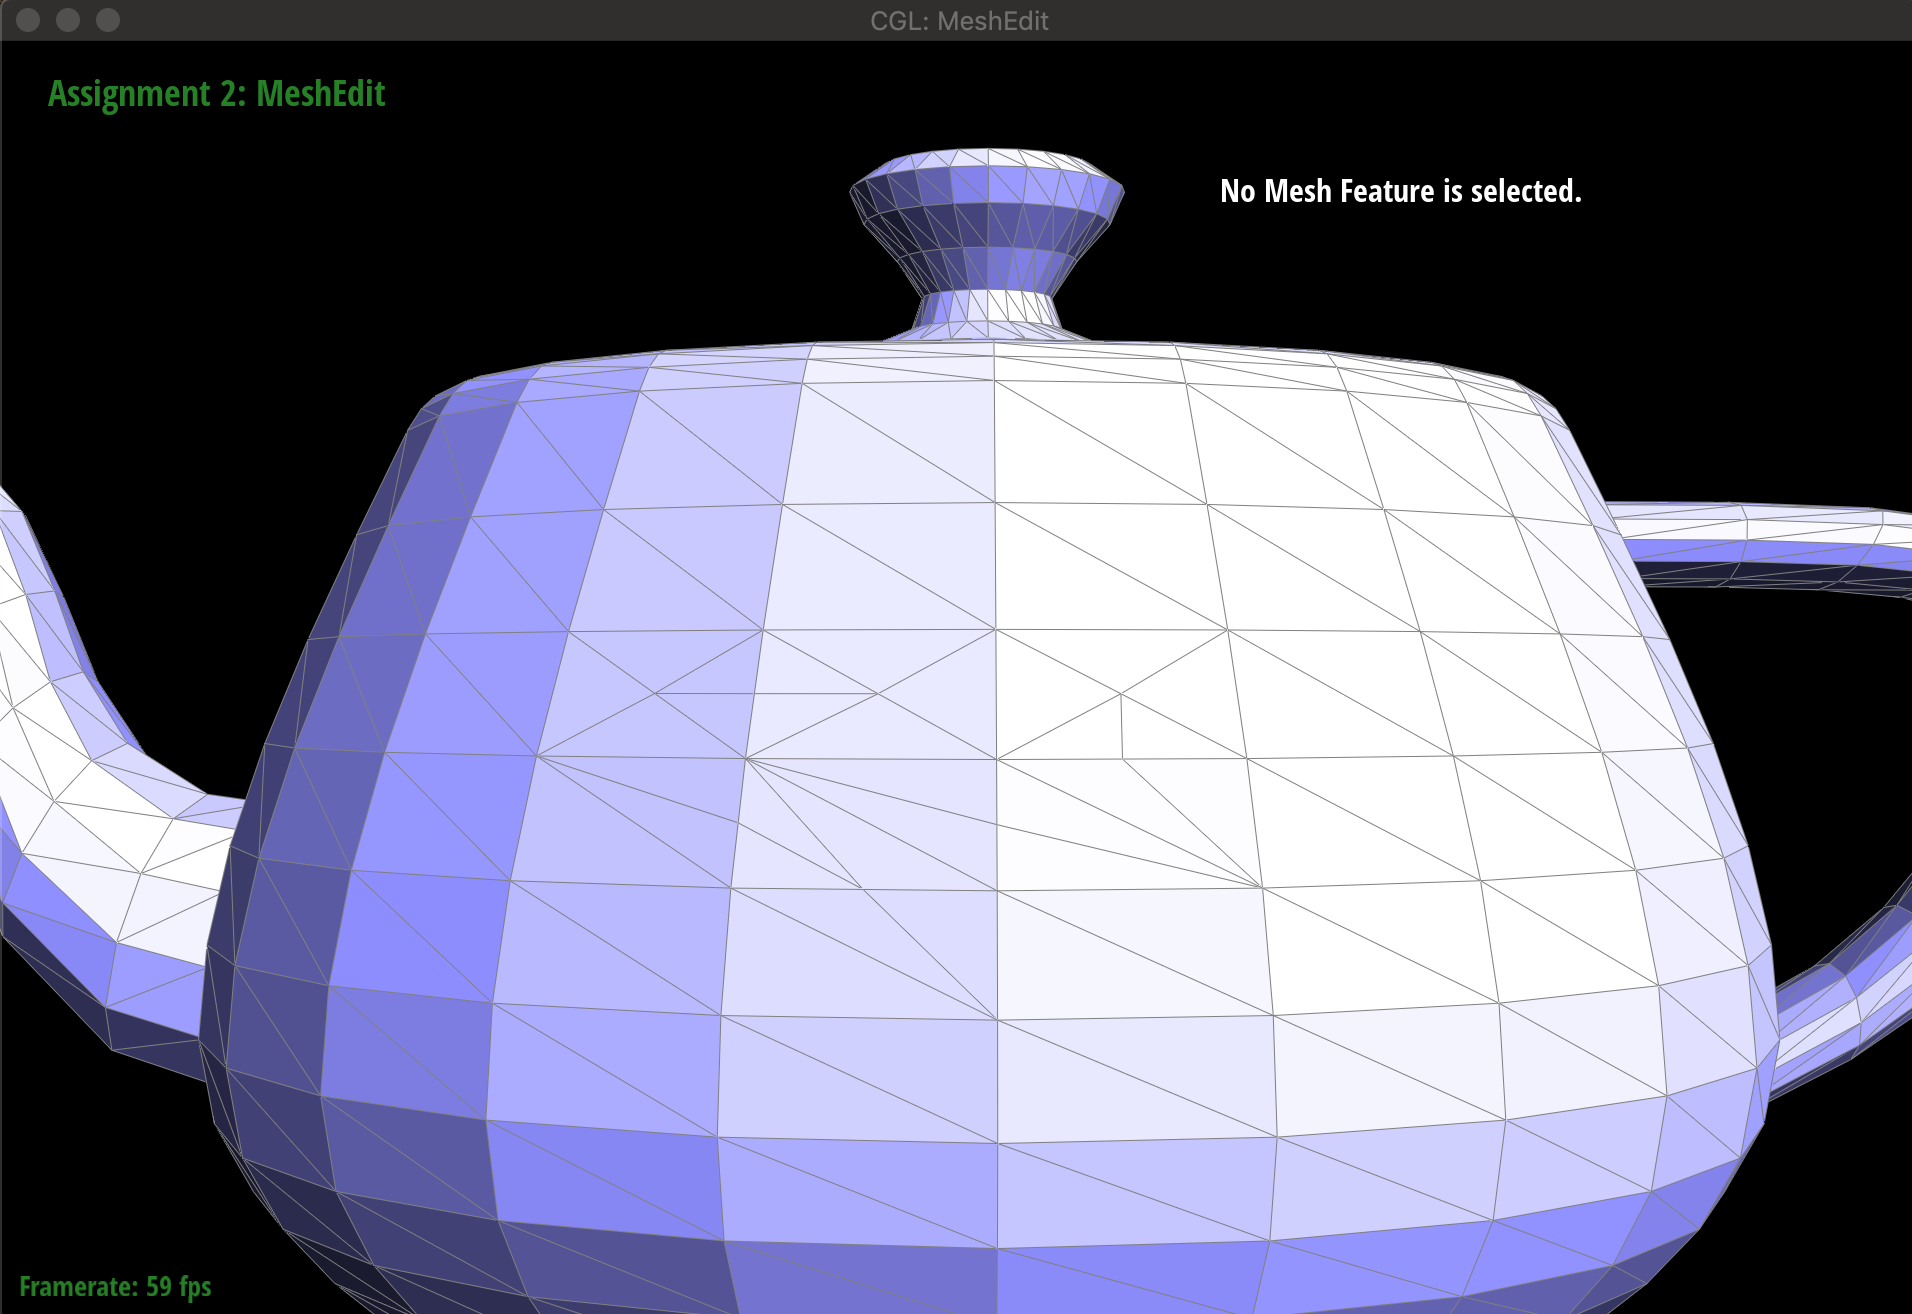
}#### 运行结果 在GUI界面中选中边,然后按下S键即可。

Part 5: Half-edge split
题目介绍
本题和上一题思路类似,只不过变成了split分割边。如下所示
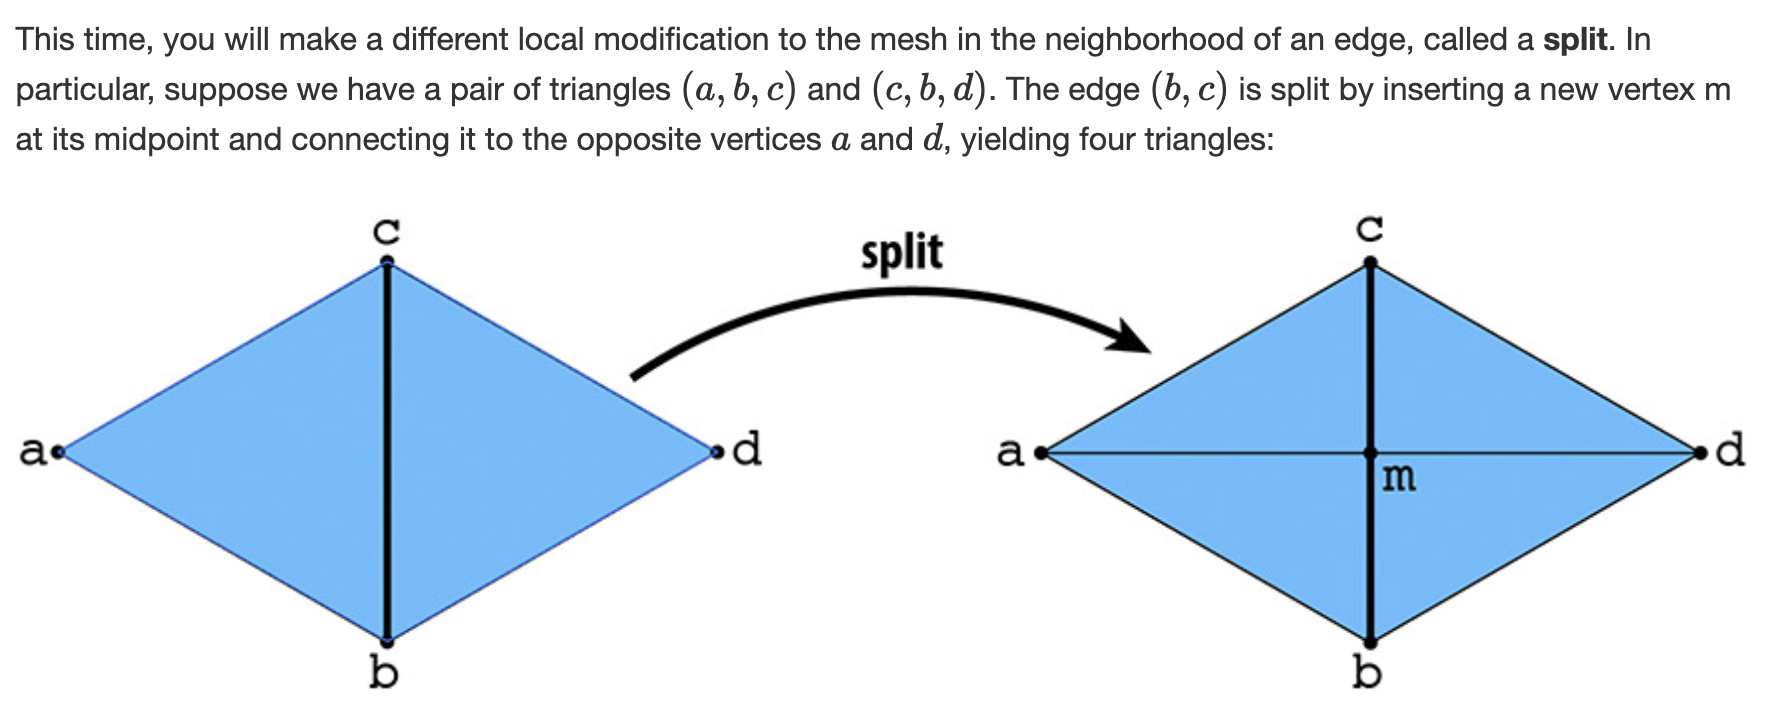
实现原理
同样参考这篇guide,这次需要新加上几个点,比如说一个新的vertex,三条edge,六条新的halfedge,两个face。依旧是修改一堆iterator,我的实现图如下。

VertexIter HalfedgeMesh::splitEdge(EdgeIter e0)
    {
        // TODO Part 5.
        // TODO This method should split the given edge and return an iterator to the newly inserted vertex.
        // TODO The halfedge of this vertex should point along the edge that was split, rather than the new edges.

        FaceIter f0 = e0->halfedge()->face();
        FaceIter f1 = e0->halfedge()->twin()->face();

        if(f0->isBoundary() || f1->isBoundary())
        {
            return e0->halfedge()->vertex();
        }

        HalfedgeIter h0 = e0->halfedge();
        HalfedgeIter h1 = h0->next();
        HalfedgeIter h2 = h1->next();
        HalfedgeIter h3 = h0->twin();
        HalfedgeIter h4 = h3->next();
        HalfedgeIter h5 = h4->next();
        HalfedgeIter h6 = h1->twin();
        HalfedgeIter h7 = h2->twin();
        HalfedgeIter h8 = h4->twin();
        HalfedgeIter h9 = h5->twin();

        VertexIter v0 = h0->vertex();
        VertexIter v1 = h3->vertex();
        VertexIter v2 = h6->vertex();
        VertexIter v3 = h8->vertex();

        EdgeIter e1 = h1->edge();
        EdgeIter e2 = h2->edge();
        EdgeIter e3 = h4->edge();
        EdgeIter e4 = h5->edge();

        //创建新的halfElement
        //这里创建的时候已经加入mesh的list里面去了,所以确实改变了mesh的list

        //三条新的edge
        EdgeIter e5 = newEdge();
        EdgeIter e6 = newEdge();
        EdgeIter e7 = newEdge();

        //六个新的halfedge
        HalfedgeIter h10 = newHalfedge();
        HalfedgeIter h11 = newHalfedge();
        HalfedgeIter h12 = newHalfedge();
        HalfedgeIter h13 = newHalfedge();
        HalfedgeIter h14 = newHalfedge();
        HalfedgeIter h15 = newHalfedge();

        //两个新的face
        FaceIter f2 = newFace();
        FaceIter f3 = newFace();

        //一个新的vertex
        VertexIter v4 = newVertex();
        v4->position = (v1->position + v0->position) / 2;

        //重新分配
        h0->setNeighbors(h1, h3, v4, e0, f0);

        h1->setNeighbors(h10, h6, v1, e1, f0);

        h2->setNeighbors(h14, h7, v2, e2, f3);

        h3->setNeighbors(h11, h0, v1, e0, f1);

        h4->setNeighbors(h12, h8, v0, e3, f2);

        h5->setNeighbors(h3, h9, v3, e4, f1);

        h6->setNeighbors(h6->next(), h1, v2, e1, h6->face());

        h7->setNeighbors(h7->next(), h2, v0, e2, h7->face());

        h8->setNeighbors(h8->next(), h4, v3, e3, h8->face());

        h9->setNeighbors(h9->next(), h5, v1, e4, h9->face());

        h10->setNeighbors(h0, h15, v2, e5, f0);

        h11->setNeighbors(h5, h12, v4, e7, f1);

        h12->setNeighbors(h13, h11, v3, e7, f2);

        h13->setNeighbors(h4, h14, v4, e6, f2);

        h14->setNeighbors(h15, h13, v0, e6, f3);

        h15->setNeighbors(h2, h10, v4, e5, f3);

        e0->halfedge() = h0;
        e1->halfedge() = h1;
        e2->halfedge() = h2;
        e3->halfedge() = h4;
        e4->halfedge() = h5;
        e5->halfedge() = h10;
        e6->halfedge() = h14;
        e7->halfedge() = h11;

        f0->halfedge() = h0;
        f1->halfedge() = h3;
        f2->halfedge() = h4;
        f3->halfedge() = h2;

        v0->halfedge() = h4;
        v1->halfedge() = h3;
        v2->halfedge() = h2;
        v3->halfedge() = h5;
        v4->halfedge() = h0;
        return v4;
    }
运行结果
我随便split,不是很有美感2333.
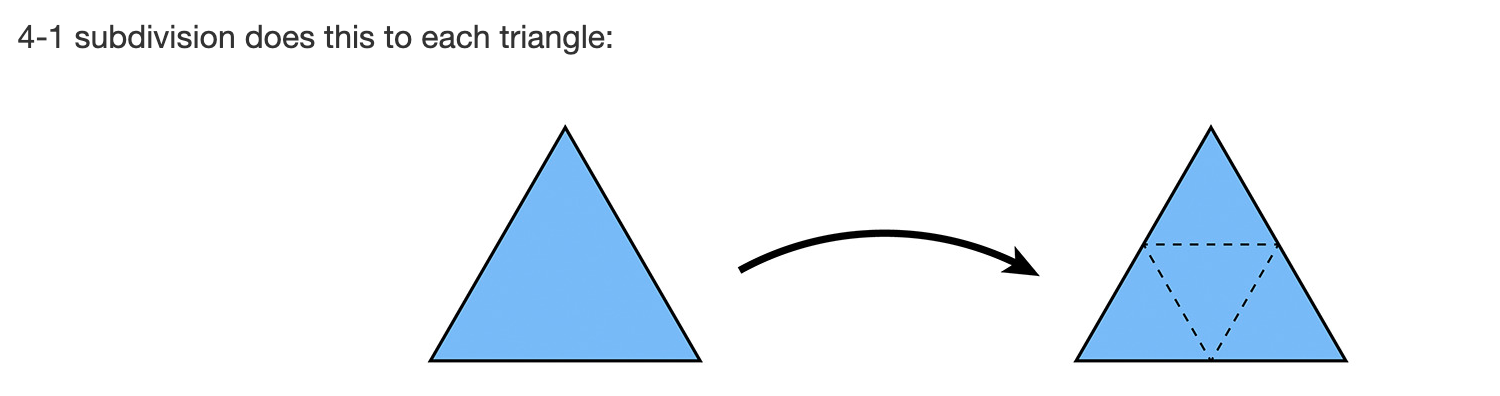
Part 6: Loop subdivision for mesh upsampling
题目介绍
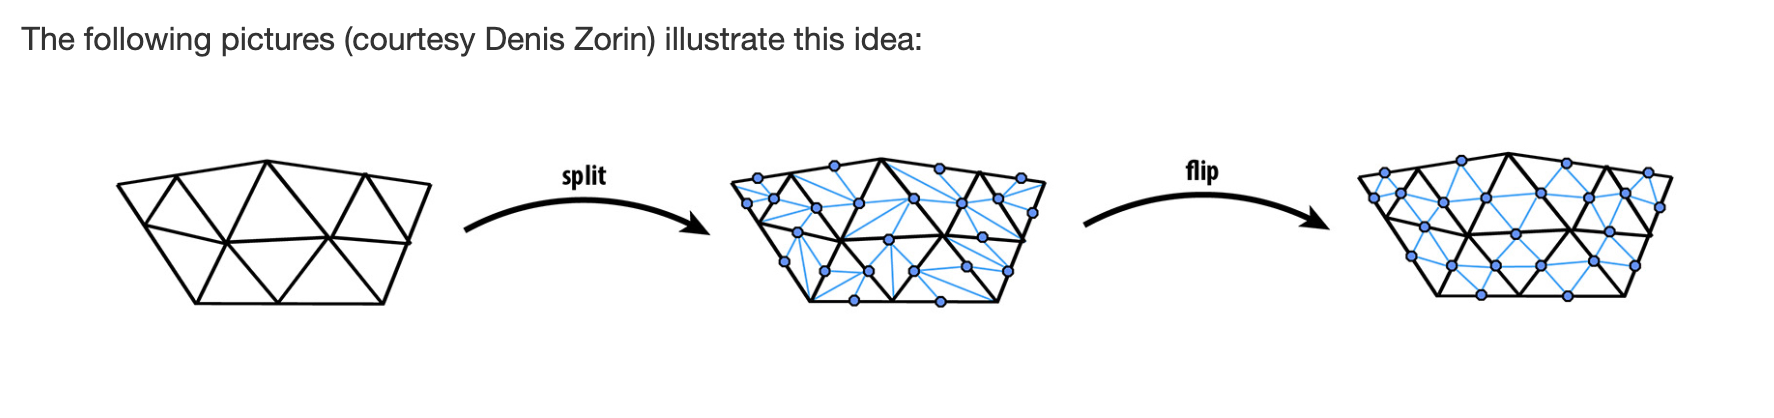
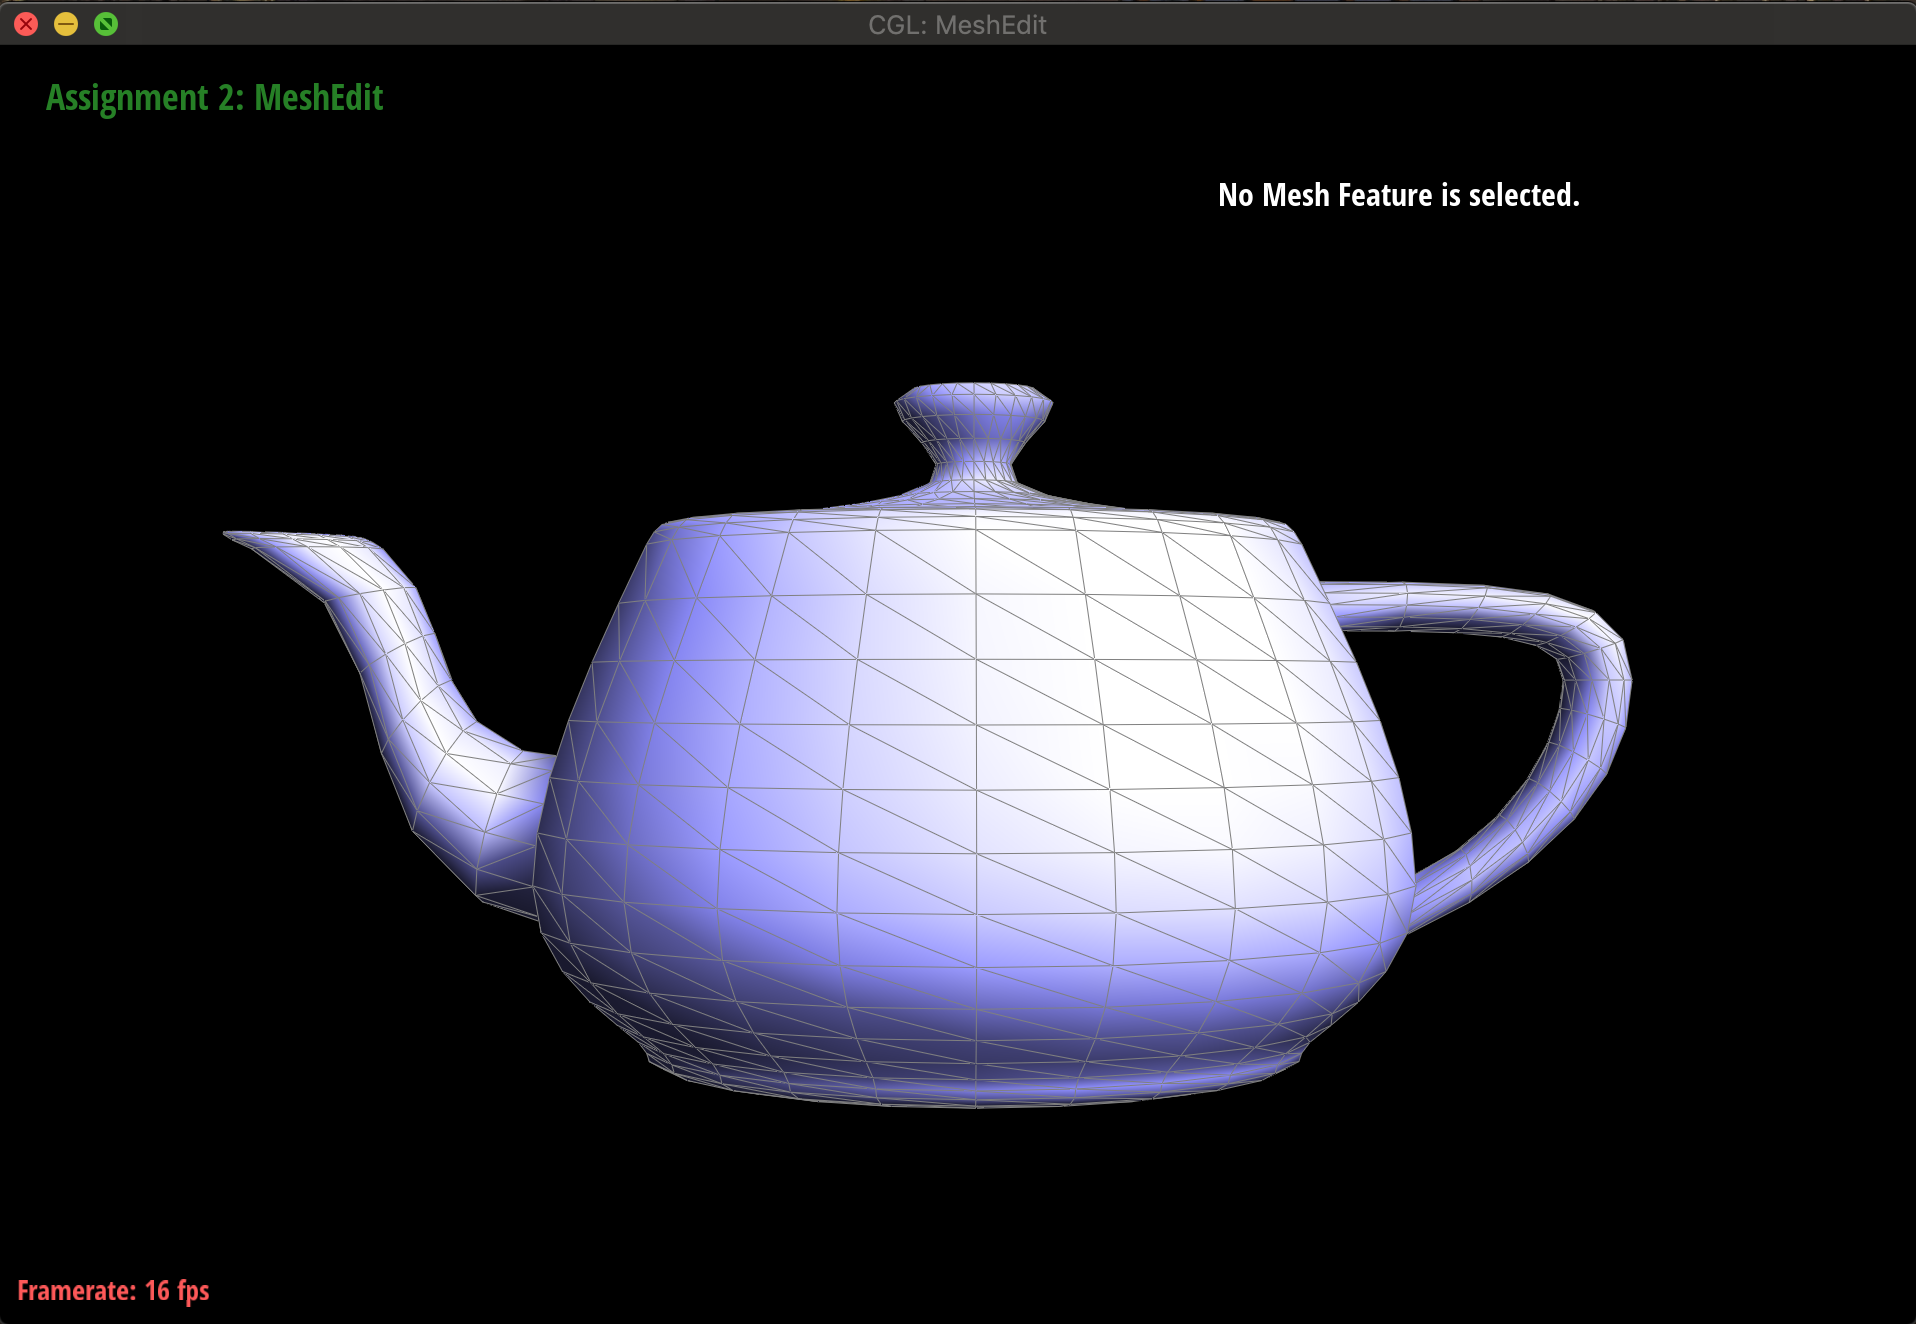
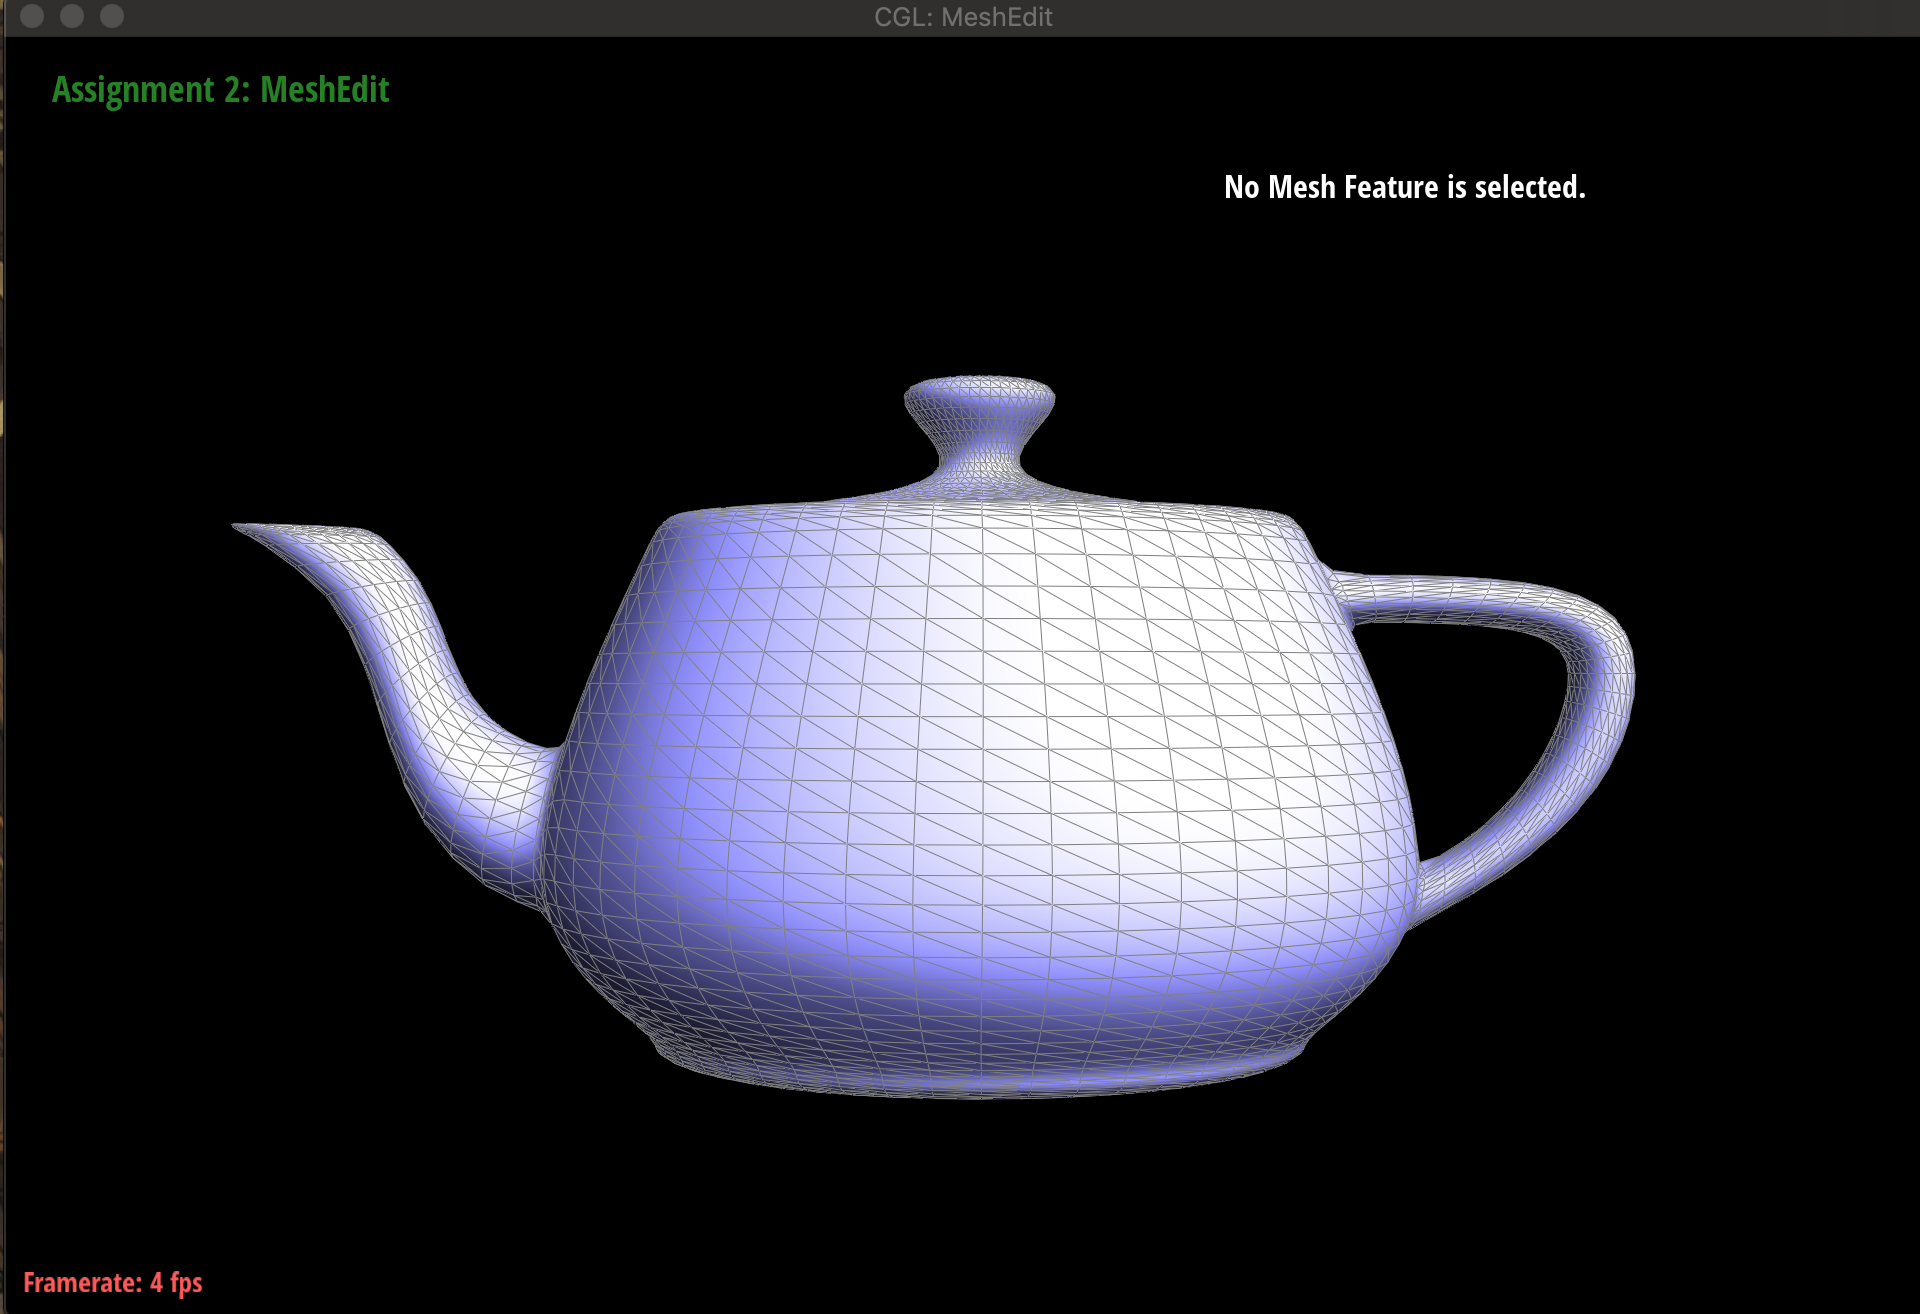
曲面细分是最后一题也是总体上最复杂的一题,这一题的步骤很多,出了问题debug起来也比较复杂。我会一步一步说明。首先说一说曲面细分,曲面细分就是把一个三角面分割成多个子面(比方说四个),这样增加总体的face,使得模型可以变得更加精细。如下图
实现原理
(1)首先遍历mesh中的全部顶点,将每个顶点的
isNew属性标记为false,同时计算每个顶点在曲面细分之后的新位置,存在该顶点的newPosition属性之中。 计算方法如下,新创建的点根据八分之三,八分之一的权重加权求和。旧的顶点在曲面细分之后也会有一个新的位置,计算方式也是加权求和,与自身相邻的顶点权重是u,自身权重是1-(n*u)。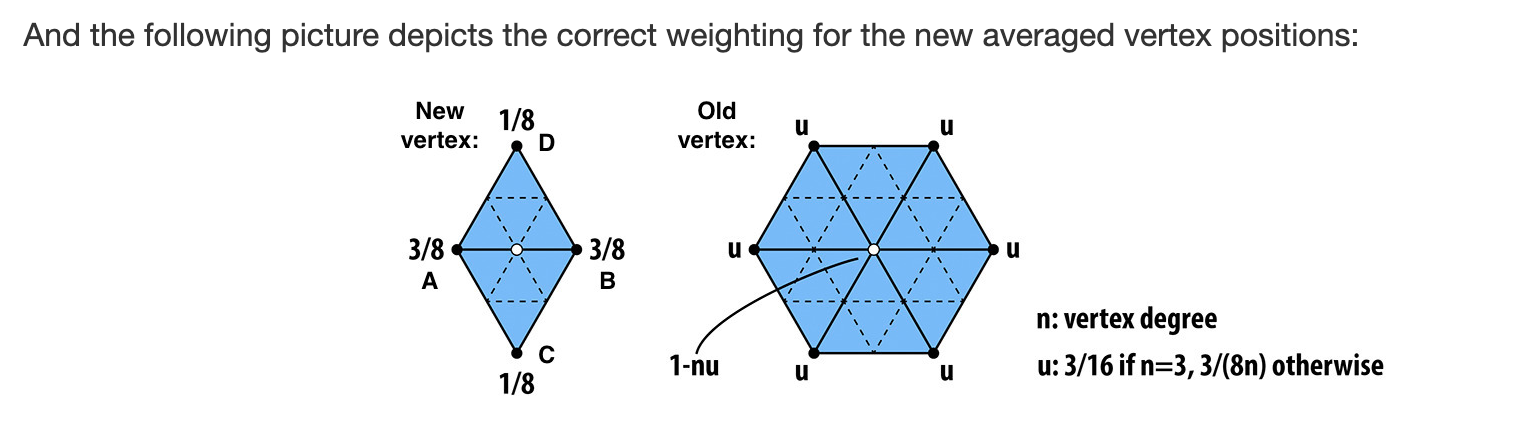
(2)然后遍历全部的edge,确定将要创建的新点的位置。
(3) 创建一个新的originEdgeList,这里之所以要复制一个Edgelist,而且这个list存储的是指向指向edge的iterator的iterator。
是因为如果split了edge,那么mesh的edge链表就会添加进指向新创建的edge的iterator,那么遍历的时候就会遍历到这些新创建的然后再次split,陷入死循环。(4)split全部的edge,记住要遍历originEdgeList,然后设置新创建的订点的
newPosition属性以及新创建的edge的isNew属性。这些属性的设置非常关键!!!因为倒数第二步的时候会根据这些属性来决定那些边需要flip。(5)flip所有连接 新顶点和 旧顶点的 新边!!!之所以先split再flip是这样实现起来方便一些。
(6)再次遍历一遍所有的顶点,将每个顶点的新位置覆盖当前位置。
    void MeshResampler::upsample(HalfedgeMesh &mesh)
    {
        // TODO Part 6.
        // This routine should increase the number of triangles in the mesh using Loop subdivision.
        // Each vertex and edge of the original surface can be associated with a vertex in the new (subdivided) surface.
        // Therefore, our strategy for computing the subdivided vertex locations is to *first* compute the new positions
        // using the connectity of the original (coarse) mesh; navigating this mesh will be much easier than navigating
        // the new subdivided (fine) mesh, which has more elements to traverse. We will then assign vertex positions in
        // the new mesh based on the values we computed for the original mesh.


        // TODO Compute new positions for all the vertices in the input mesh, using the Loop subdivision rule,
        // TODO and store them in Vertex::newPosition. At this point, we also want to mark each vertex as being
        // TODO a vertex of the original mesh.
        // 第一步,计算旧顶点的新位置同时标记isNew为false。
        for(auto it = mesh.verticesBegin(); it!= mesh.verticesEnd(); it++)
        {
            //先计算新的位置
            it->isNew = false;
            Vector3D newPosition(0, 0, 0);
            float sum = 0;
            auto nit = it->halfedge()->twin();
            auto originNit = nit;
            auto n = it->degree();
            //注意!!!!浮点数,如果直接3/16是0
            float u = (n == 3) ? (3.0/16.0) : (3.0 / (8.0 * n));
            do{
                sum += u;
                newPosition = newPosition + u * (nit->vertex()->position);
                nit = nit->next()->twin();
            }while (nit != originNit);
            sum += 1 - n*u;
            newPosition = newPosition + (1.0 - n*u) * it->position;
            newPosition = newPosition / sum;
            it->newPosition = newPosition;
        }


        // TODO Next, compute the updated vertex positions associated with edges, and store it in Edge::newPosition.

        //第二步计算所有新点的位置(每个edge上一个新的点),然后存在edge的newposition属性里
        for(auto it = mesh.edgesBegin(); it!=mesh.edgesEnd(); it++)
        {
            //每个边上一个新的点
            Vector3D newPosition(0, 0, 0);
            if(it->halfedge()->face()->isBoundary() || it->halfedge()->twin()->face()->isBoundary())
            {
                //边界情况直接中点
                newPosition = it->halfedge()->vertex()->position / 2.0 + it->halfedge()->twin()->vertex()->position / 2.0;
            }
            else
            {
                Vector3D v0 = it->halfedge()->vertex()->position;
                Vector3D v1 = it->halfedge()->twin()->vertex()->position;
                Vector3D v2 = it->halfedge()->next()->twin()->vertex()->position;
                Vector3D v3 = it->halfedge()->twin()->next()->twin()->vertex()->position;
                //注意啦,这里也被round to zero了,记住浮点数
                newPosition = v0 * 3.0/8.0 + v1 * 3.0/8.0 + v2 * 1.0/8.0 + v3 * 1.0/8.0;
            }
            it->newPosition = newPosition;
        }

        // TODO Next, we're going to split every edge in the mesh, in any order.  For future
        // TODO reference, we're also going to store some information about which subdivided
        // TODO edges come from splitting an edge in the original mesh, and which edges are new,
        // TODO by setting the flat Edge::isNew.  Note that in this loop, we only want to iterate
        // TODO over edges of the original mesh---otherwise, we'll end up splitting edges that we
        // TODO just split (and the loop will never end!)

        //第三步,复制所有指向edge的iterator
        vector<EdgeIter> originEdgeList;
        auto copyIt = mesh.edgesBegin();
        do{
            auto newIt = copyIt;
            newIt->isNew = false;               //一开始遍历的时候每次都改成false
            originEdgeList.push_back(newIt);
            copyIt++;
        }while(copyIt != mesh.edgesEnd());

        //第四步,split所有的边
        //注意这里,it是EdgeIter的iterator,而*it才是EdgeIter类型
        int countIt = 0;
        for(auto it = originEdgeList.begin(); it != originEdgeList.end(); it++)
        {
            // 返回split之后的点
            countIt++;
            auto v = mesh.splitEdge(*it);
            // 注意isNew的修改,这里将除了最初的edge以外的新创建的edge全部改为true;
            v->isNew = true;
            // newPosition 到 position的时候就为空了。
            v->newPosition = (*it)->newPosition;

            auto newHalfIt = v->halfedge();

            newHalfIt->edge()->isNew = false;
            newHalfIt->twin()->next()->edge()->isNew = true;
            newHalfIt->twin()->next()->twin()->next()->edge()->isNew = false;
            newHalfIt->next()->next()->edge()->isNew = true;
        }

        // TODO Now flip any new edge that connects an old and new vertex.
        // 第五步,flip所有连接新点和旧点的新边。
        for(auto it = mesh.edgesBegin(); it != mesh.edgesEnd(); it++)
        {
            // != 与异或的功能一致
            if(it->halfedge()->vertex()->isNew != it->halfedge()->twin()->vertex()->isNew )
            {
                if(it->isNew)
                    mesh.flipEdge(it);
            }
        }

        // TODO Finally, copy the new vertex positions into final Vertex::position.
        // 第六步,最后遍历一遍全部顶点,将新位置赋值给当前位置
        for(auto it = mesh.verticesBegin(); it != mesh.verticesEnd(); it++)
        {
            it->position = it->newPosition;
        }
    }
运行结果
下面分别是没有曲面细分,进行一次曲面细分,进行两次曲面细分的结果。
(ps:这次的project下文件夹dae里有好多模型数据,大家可以玩玩看,而且还有最后一个自选的模型模块,我偷懒没搞,下次有机会再把这个坑填上去吧)
总结
这次project的前面部分是比上一个简单一些的,通过这次project,基本上了解了贝塞尔曲线,de Casteljau算法,曲面细分,一个很有意思的数据结构halfedgemesh。但是感觉自己的知识还是很浅薄啊,尚需努力,我可是要立志成为图形学master的男人啊kora!!!
本博客所有文章除特别声明外,均采用 CC BY-SA 3.0协议 。转载请注明出处!